How to Laminate Dough
Every laminated dough, be it puff pastry, croissant or Danish, begins its life as a thick slab of butter encased in a dough “envelope”. This 3-layer dough-butter-dough package is then flattened and folded however many times it takes to get the number of layers the maker is after. A folded flaky pastry for say, a galette, can have as few as 27 layers. Croissants often have 81, Danish 243, and puff pastry can have as many as 2187 (though I prefer the less flaky version of 729).
What these oddly specific numbers have in common is that they’re all factors of the number three. 243 is three to the fifth power which is what you get when you “turn” (i.e. execute a letter fold on) a three-layer dough five times. Pretty neat stuff that requires nowhere near the work you’d think. So let’s begin then, shall we?
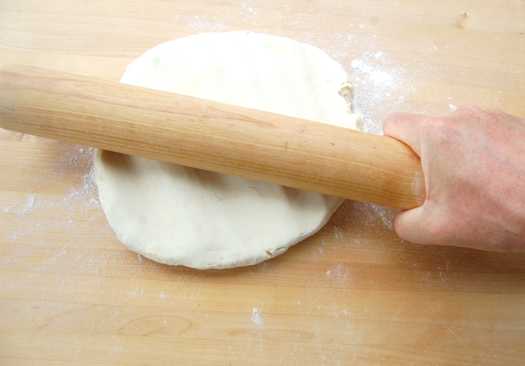
laminating dough it actually a pretty straightforward affair, requiring only the most rudimentary tools, primarily this:
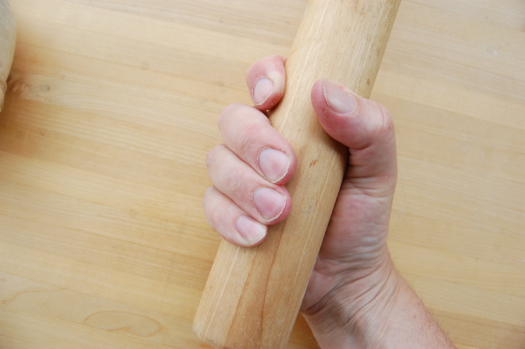
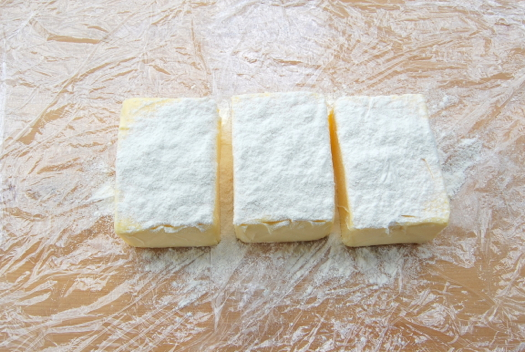
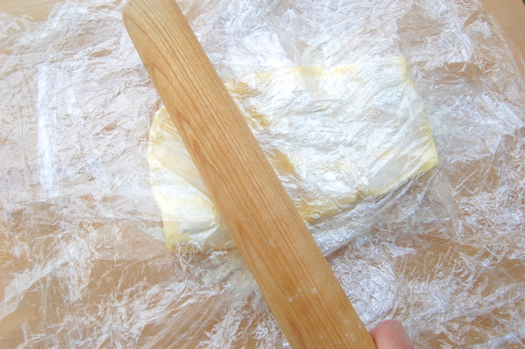
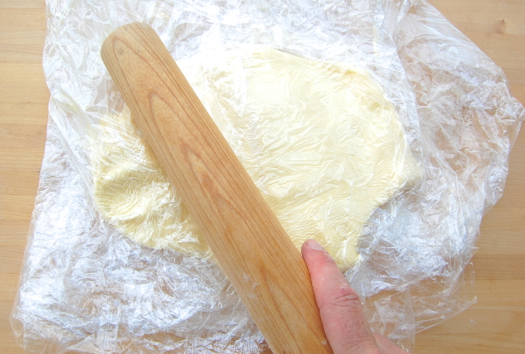
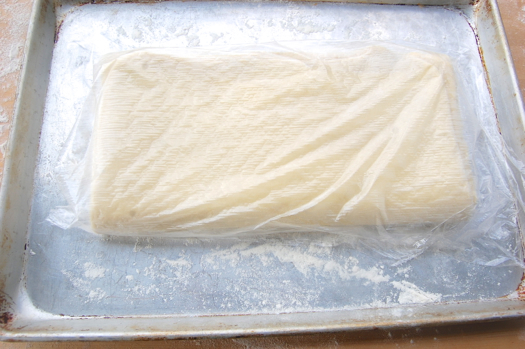
A club. Actually a Chinese rolling pin, but the overall effect is the same. Next we need a some butter, large pieces, ideally left out of the fridge for about 20 minutes. Below is about a pound and a half of it sitting on a double layer of plastic wrap. It’s the minimum I usually work with, since I figure if I’m going to the trouble of rolling pastry, I’d like to have some left over to freeze. Notice there’s flour on top. That helps the butter maintain its consistency longer, which is important for reasons you’ll soon see. Add about three tablespoons per pound of butter.
So now all we do is cover the butter and flour with another double-thick layer of plastic…
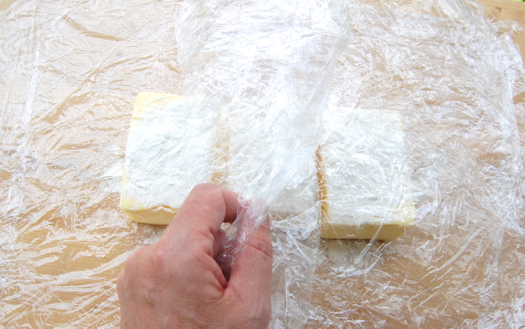
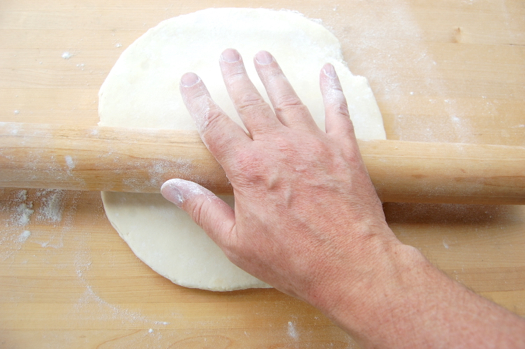
…and apply Club A to Butter Pile B.
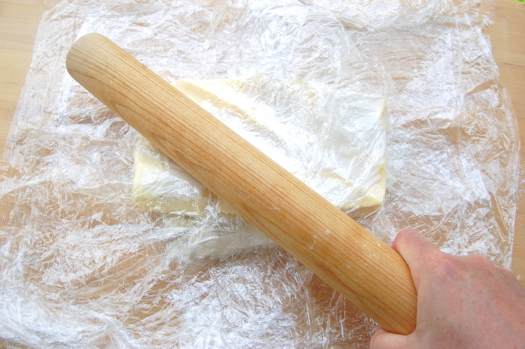
Repeat. Repeat. Repeat. Feel good? You bet it does. And if your spouse and/or children aren’t running into the room looking terror-stricken, you’re not hitting hard enough. Keep letting out your pent-up frustration until it looks rather flat.
Shore up the sides of the slab every so often with the side of your pin.
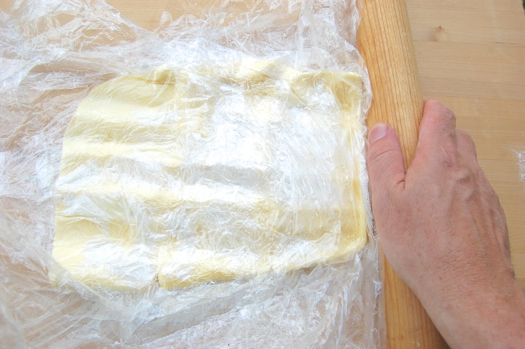
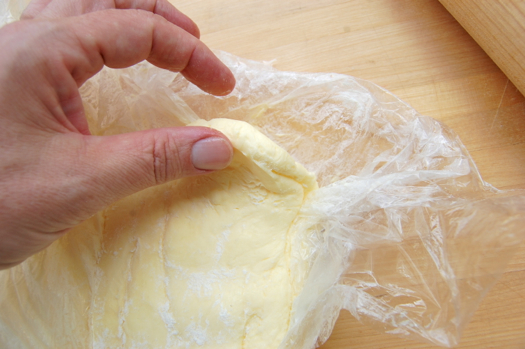
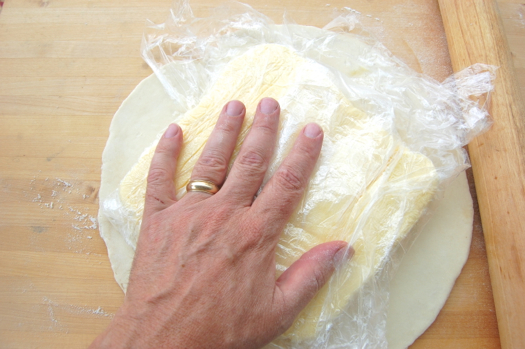
When it’s less than an inch or so thick peel back the plastic wrap (don’t worry if you’ve beaten a couple of holes in it)…
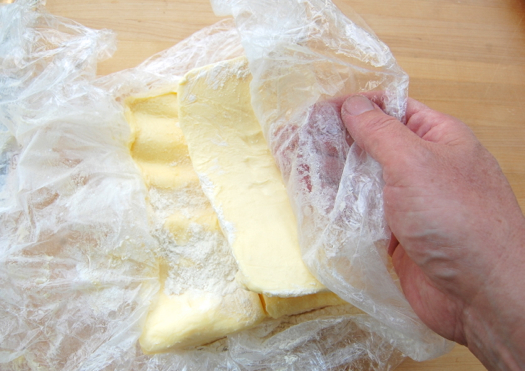
…and pile the butter up again.
Repeat the merciless beating.
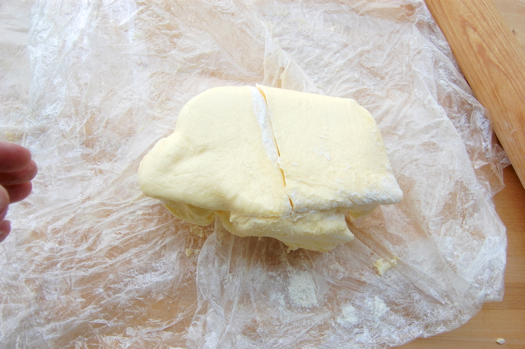
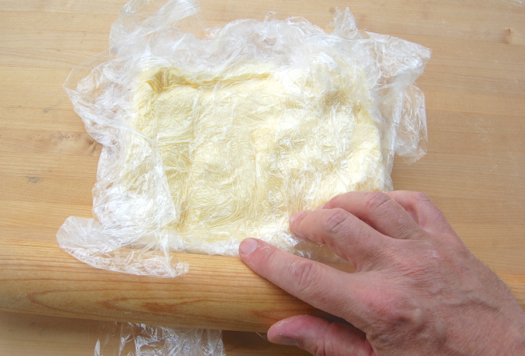
What’s it all for other than stress release? Good question. You’re working in the flour while at the same time softening and shaping the butter into one giant pat. What you’re shooting for here is a butter consistency rather like play dough. Not too firm, since you want it to spread as you roll the dough out. But then not too soft either, since if the butter actually melts it’ll soak into the dough and ruin the layering effect. What you’re after is a plastic texture that isn’t at all greasy looking or feeling. If the butter starts to shine, it’s too warm. Put it back in the fridge for half an hour and start over with the tension release (hey, why not?).
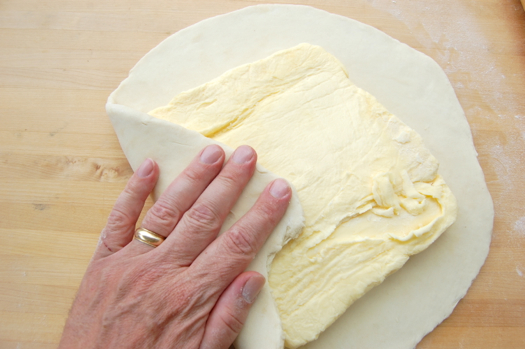
The magic texture may take only one good pounding. It all depends on the temperature of the butter and the room. That consistency looks like this: a pale, dull powdery-looking surface.
Once you’re there you want to again shove it back into the shape of a big butter pat, using the side of your club, like so:
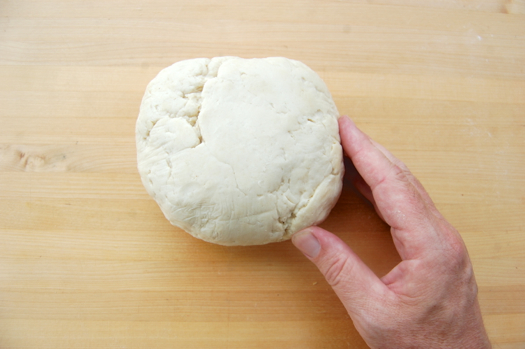
When that’s done set it aside for just a moment. Now is the time to fetch your dough. Set it out on the lightly floured board.
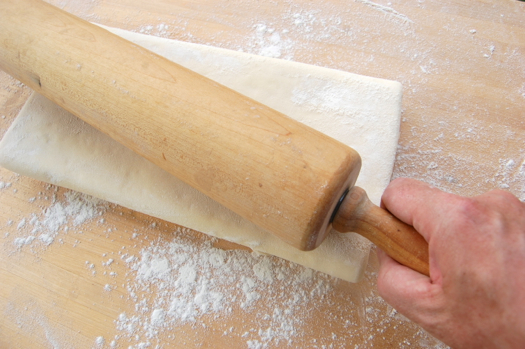
Roll it a little in one direction…
…then the other until it’s a little larger than the butter pat.
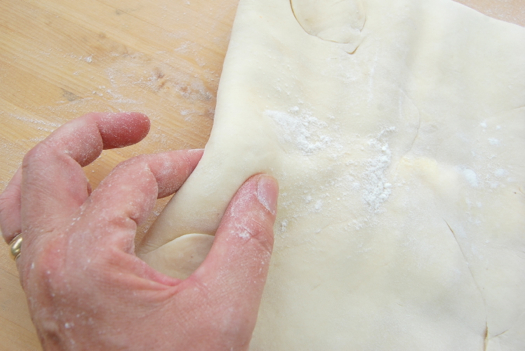
Put the butter pat on top like so…
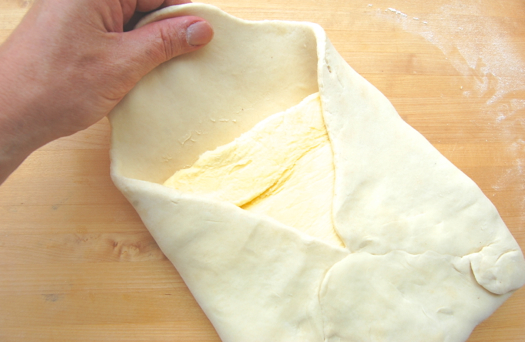
Peel off the plastic and begin to fold the dough packet up:
As you’re doing this you want to pull the dough up around the corners and edges to make sure it’s as taught as reasonably possible.
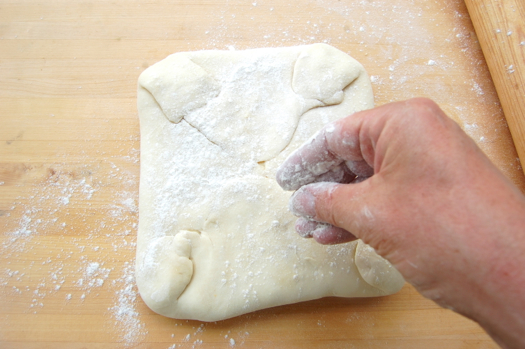
Next squeeze the all the holes and seams closed (use a little water if you like):
 >
>
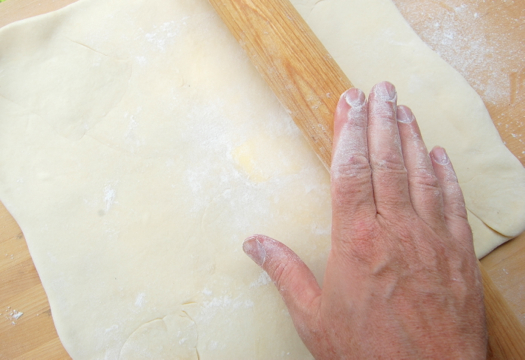
So now what do you think is next? If you guessed more of this:
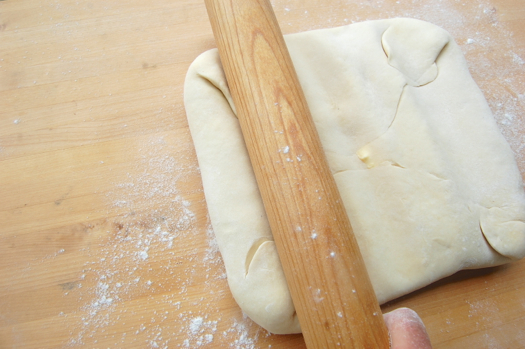
…you’d be right. Because when making pastry, violence is always the first resort. You want to start by hitting the dough square in the middle and working your way out to one side, then the other…about three hits per direction. The idea here is to drive the softened butter as far as possible to the edges of the packet.
Turn the dough 90 degrees and repeat.
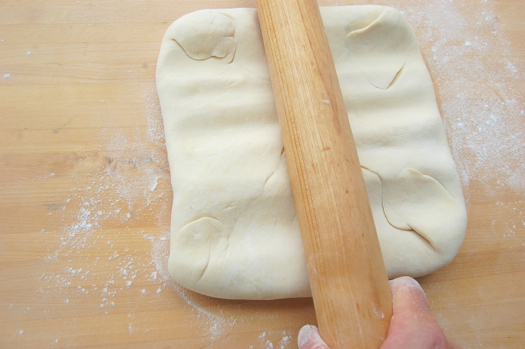
Smack it some more, then rotate the package again a couple of more times. Smack, turn. Smack, turn. Smack, turn. Along the way if you see any conspicuous mounds of butter push up in the middle, give them a smack for good measure (no need to discriminate). A minute or two of this and the dough should be starting to flatten out, which means it’s time to start rolling. I use a smaller pin at this point since the dough is usually pretty soft, but you can use a big one if you prefer.
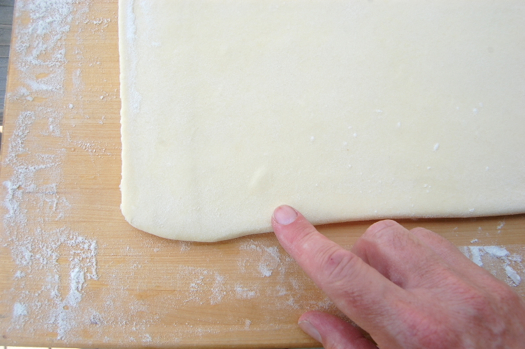
If you’ve beaten the envelope with sufficient ferocity, there should be butter within half an inch of all the edges.
If not it’s not the end of the world. Just grab a knife or bench scraper and trim off the un-buttered lip of dough until you can either see a thin layer of butter, or you can feel it close to the edge. Then give the dough a couple of more firm rolls with the pin until it’s about a third longer than it is wide.
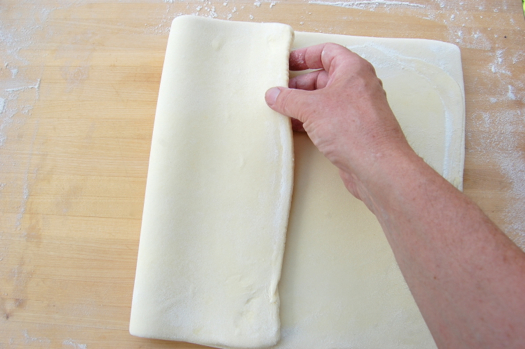
Now it’s time for the first fold. Brush away any flour that you see on the sheet, then fold the outside third of the dough inward like a letter…
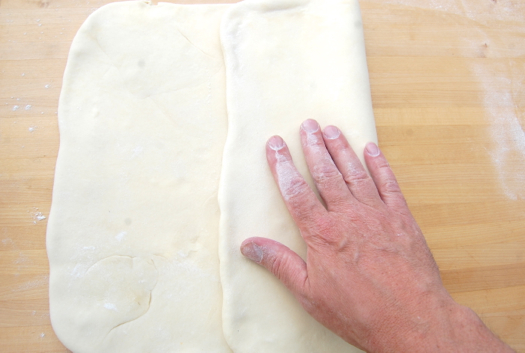
…and repeat with the other side.
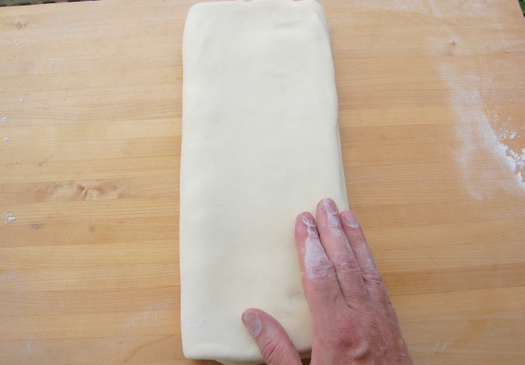
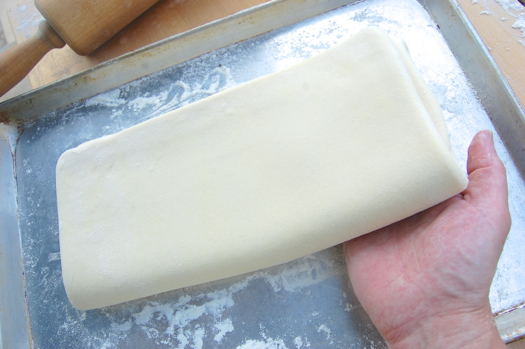
Done! Slip your hands under the dough and transfer it to a sheep pan. Put on the plastic wrap and put the whole thing in the fridge for an hour.
Once the dough has chilled repeat the rolling and folding process again, only this time since the dough will be a good deal stiffer you’ll want to use the largest pin you have for leverage.
Roll it out again into a rectangle.
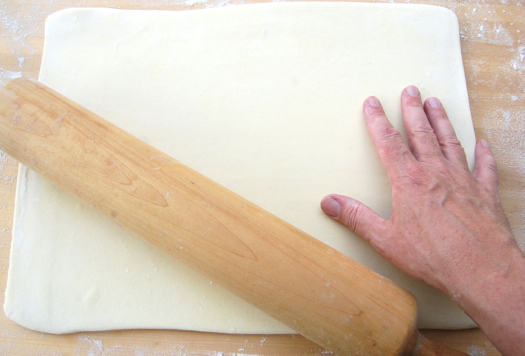
Should you see any medium-to-large bubbles along the way, slip them with a sharp knife and let the air out. This one is pretty small and not real worth worrying about.
Fold the dough once again like a letter.
And put it away in the fridge once again for about an hour
Having crested this hill it is now time to crack a celebratory beer, because it’s all smooth sailing going forward (whatever that curious mixture of metaphors means). All you have to do is pull the dough out every so often and give a turn or two depending on the dough you’re making, puff pastry, croissant dough, Danish dough, whatever.
In the early stages of a dough-rolling project, I find I can get away with two turns between chills. But judge for yourself. If the dough is feeling extremely limp, you find that you’re tearing layers just by handling it, or butter oozes out looking shiny, give it more fridge time. Alternately, if as you roll you notice that the butter just under the surface of the dough is rigid and is breaking apart like icebergs off the Antarctic ice sheet, give it a little less.
If I’m making puff pastry (which requires six turns minimum), I can usually do two turns at a time early on. Much past four turns though, and the dough begins to get a.) elastic and b.) warm. So I let the dough chill a full hour before the fifth and sixth turns, and sometimes even more for the seventh (if I’m doing one).
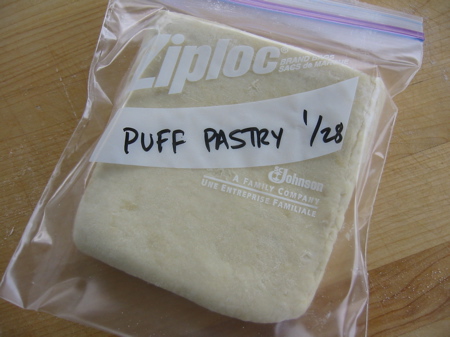
Once it’s all done I typically roll the dough into a long strip, cut it into roughly pound-size pieces, and freeze it in bags. Boy does this stuff ever come in handy.
Ok really…where was this post the first time I tried this!! :)I am completely ready to put the apron back on and grab my rolling pin for another try! Go figure, all I needed were the pictures! Thanks Joe, you rock!!
Ha! Outstanding, Stephanie! Let me know how it turns out! – Joe
Hi Joe!
I just came across your website today!and the only thing i can say is, where have you been all this time?!!!:). Anyway, I attempted making puff pastries several times, trying out different recipes each time and I have researched and watched a dozen videos that could help me produce a successful puff pastry, it all turned out a failure. I am not sure if I already did it correctly, only not knowing it or not.Because when it came to the baking process, my puff pastry ends up raw on the inside?and they shrink, like really shrink unlike the ones I see in pictures and other websites. please could you help me?
many Thanks!
Casey
Ha! Right here is where I’ve been. Where have YOU been? 😉
But really, I’m very pleased that you stopped in to see me. It’s possible that you’re not baking your pastry in an oven that’s hot enough. That might explain why the layers aren’t expanding and the butter is simply melting, creating the appearance of rawness when the issue is really just dough thoroughly soaked in butter. However it sounds to me like you don’t have the technique quite down yet. Adding more flour to the butter pat (as I’ve been discussing this past week) will probably help a lot. Or you can try Hermé’s inverse puff pastry, which is quite easy and will probably deliver a successful dough. As an afterthought, I wonder if you might be letting the dough get too warm before baking. That could cause the flakes to collapse as well.
Keep me updated on your progress, Casey. These sorts of issues always end up getting solved one way or another. Don’t despair. We’ll get you up and making champion pastry in no time.
Cheers,
– Joe
Maybe its because I am a very ambitious little baker, as i always wanted to bake everything from scratch and only thinks that there is only one way to make an impressive and delicious puff pastry, which is the traditional way:):) Thanks a lot Joe! I’ll try first Hermé’s inverse puff pastry your recommending and i’ll update you soon:). Yes, I admit the weather here is WARM! but after I have cut out the puff pastry to the shapes i want, I always put them back to the fridge and give them 15-20 mins of chilling before I bake them:):)
-Casey:)
Let me know how it goes. The extra flour in the butter pat will probably slow the melting down enough where you’ll notice an improvement. Ambition is a good thing — let me know how it goes!
Hi Joe!,
I have been referring to your site off an on for a few months now when I’m stuck making things at home. You’ve been a life saver! I have a question for you though. When proofing puff pastry in a proof box what is the ideal time and humidity level?
Hey Amanda! Puff pastry doesn’t need to be proofed since it has no yeast in it. Proofing will actually ruin it, since the butter will soften or even melt. Other laminated doughs like croissant and Danish dough need to be proofed, however. If you have a proofer that you can adjust you want a temperature between 85 and 90 degrees Fahrenheit, and a humidity of 65-70%. As for the timing that’s going to vary. With a proper proofer set to 85 degrees, I’d start out with 30 minutes and see how much progress you’ve made. After that check at ten minute intervals until the pastries are slightly puffy but not soft.
Best of luck!
Hi Joe, I’ve tried many danish recipe from the internet and none have ever turned out right. Your recipe is pretty much the same as the others but your directions are more detailed for the proper lamination
and the proofing was never clear on any other recipe.
I really think this one will finally give me the real thing. The dough and butter are in the fridge, Ill let you know how they turn out.
I hope so Tony! If you have problems let me know and I’ll help you troubleshoot. Spreading the gospel of homemade Danish is a mission of mine!
Cheers,
– Joe
Joe,
Thank you for your recipes and your fantastic, explicit step by step instructions. I’ve earmarked a couple of recipes, and I’m trying to build up enough courage to try my hand at macarons. However, I thought I’d try to give croissants a shot first. I guess that’s like trying to climb K2 to see if you want to attempt Everest.
I thought I’d pass on a truly trivial observation regarding puff paste, although with my level of OCD, it probably bodes well for the eventual success of both croissants AND macarons. However, I think I’ll pose it as a puzzler:
Why is the number of layers in a normal puff paste 1459 not
2187 as believed? (Shocking, isn’t it?)
Excuse me while I go weigh out my flour.
Neil
Ha! Hi Neil…great question! While it’s commonly assumed that there’s some sort of international stand for the number of folds bakers put into laminated doughs, it’s really all an illusion. You get all different sorts of combinations depending on the texture the baker wants. There are “letter” folds, “book” folds and simple half folds which, depending on how many of each you make, can add up in all sorts of ways. Lately I’ve been interested in very minimally folded laminated doughs…under 100 layers or so. There’s a whole world to explore in the world of folding. Let me know how your first attempt goes…I’ll be curious!
– Joe
Hi Joe,
OK, I won’t keep you in suspense any longer.
So, how, you ask, how do I come this startling conclusion? (And, yes, I am talking about the normal three-fold process you show above.)
So here’s the reason: As you make each fold in a “turn”, you match up dough to dough. Since there is no butter between these layers, they effectively act as only one layer, not two. So each “turn” has two folds, and loses two layers. And, through the magic of compounding, the total number of layers is reduced accordingly. (Ask your friendly banker for a definition of compounding. They used to pay enough interest to warrant a discussion of compounding. However it isn’t possible to compound zero interest, so they don’t talk about it any more.)
You can immediately see the effect of this stunning revelation in just the first turn. You start out with three layers in the “envelope” you show above: (dough-butter-dough). Alright, you say, now we’ll fold it twice like letterhead to complete the first “turn”. So, after the triple-fold of the first turn, the result is:
dough-butter-dough/dough-butter-dough/dough-butter-dough.
However, the “dough/dough” layers become only one layer of dough each, making a total of only 7 layers, not the nine you’d expect. So you loose two layers with each turn, and when you multiply the whole thing out you get 1459 . So, just losing two layers per turn causes you to loose 728 layers in the end. (It still sounds like my bank account.)
I suspect you’re now asking, why is this guy bothering with this inane discussion instead of actually doing something useful, like making croissants or macarons? The simple answer is that it’s easier than actually having to do the real work.
Anyhow, enough of the fun and games. Thanks for the superb recipes and research.
Neil
Hey Neil!
I had no idea you were setting me up for a brain-teaser when you wrote earlier, but this is great stuff — you’re exactly right! Heh.
Now get baking! 😉
– Joe
Loved reading this discussion! Great website, just found it today and I’m already lost in all the wonderful recipes!!! Can’t wait to try this one in particular. I’m originally from Denmark and have a heck of a time getting a good Danish here 😉
That’s what I’ve heard, Annette! A good friend of mine grew up in Denmark, and always told me that when she went home she had a terrible time finding good Danish. Clearly we need to keep the tradition alive! Let me know if I can answer any questions as you progress!
Welcome, very nice to meet you!
– Joe
How many turns for the danish?
I have a question about the way you first put the butter on the dough. I have seen several different ways of doing this. Sarabeth Levine (Sarabeth’s in NY) creates a dough ball, cuts an X in the top, lets it rest, then creates a 4 leaf clover pattern with a bump in the middle. She puts a thick piece of butter on the middle bump, f0lds the 4 dough leaves on top, rests and then starts the turning and rolling and letter folding.
I have also seen bakers who simply roll out the dough lengthwise, put the pounded-out butter slab on one side, fold the dough over the butter and start the “letter” process.
Can you tell me what the differences are and why you chose the method you did?
Thanks,
Dorothy
Hey Dorothy!
My feeling is that the differences aren’t terribly significant in terms of the final product, it’s more what the chef in question is comfortable with. I’ve seen both those methods. The dough cutting method involves that extra resting, which can be helpful in cutting down on the elasticity of the dough, making it easier to roll. But then if you rest the folded dough in the fridge for a good long while after the first turn, it probably works out about the same. As for the oblong slab method, if you can roll your dough out that perfectly, the precision fold probably helps ensure that the butter is pushed out to the very edges of the packet, and that will deliver more defined layers….which is good.
In the end I think most people just do it the way they’ve been trained. Maybe there are minute differences when all is said and done, but I’ve never been that much of a hair-splitter. Try them, though, and see what you think — then come back and file a report, because lots of readers will be interested!
– Joe
Thanks for the great question!
– Joe
Hello Sir,
Thank you very much for posting this wonderful tutorial on puff pastry. You made it look so easy n it inspired me to try it n MY PUFFY ROSE INSIDE THE OVEN. At the beginning, i could see big chunks of butter inside the dough but as I went on rolling and folding, i could not see any buttrey flecks. It was smooth and cool, just like yours. Although in order to make it tad bit “healthy” I did not rub butter into the flour, I just laminated the butter inside the dough. I also tried to make danish following your recipe and that worked as well. It would be great, if you could give me a step by step tutorial on shoe pastry and make cream puffs out of it. Including step by step tutorial on piping out the shoe pastry that takes the form of cream puffs. Making Cream puffs from scratch are something to brag about in front of monster in law. hehehe.
Glad to hear things went well for you, Payal! In fact I do have a choux pastry tutorial on the site. It’s right here:
http://www.joepastry.com/category/pastry-components/pate-a-choux/
Have fun!
– Joe
Thank you,i think you have done gud job,ever since i bump to your site it has been a great inspiration on bakery.i like pictoral and details account of your work,i work in the 5 star hotel before but not as a bakery.i plan to use knowlege from your site for guest dinner and breakfast
Thanks Mike! Please let me know how your projects turn out. I will be very interested!
– Joe
Hello Joe
I just want to say a big WELL DONE. I’ve been looking for Danish pastry and I found your website which is so helpfull to all of us. I love cooking . I read ‘Who is Joe pastry and actually I read a lot comments. Your website is awesome and the way you answer to all the people is so kind. 100 per cent I will try your recipes.
Best regards
Danny
You made my day with that, Danny. Thanks so much for the note. Please do check back in with me and let me know how the laminating goes. I’m around if I can answer any questions — about anything!
– Your New Friend Joe
Thank JO.
Hi Joe,
I’ve said it before but am saying it again..Your site is amazing. Its the best there is. I love all the info u put on it.
Any tips for making puff pastry or croissants in hot and humid weather? Should I even try it?
Thanks very much, Kamal!
It depends on how hot and humid. You’ll need plenty of refrigeration of course. However if the temperature is significantly above the melting point of your butter, you’re going to have some problems. How hot is it where you are?
– Joe
Its around 32C or 90F with about 75% humidity.
That should be alright for pastry making if you work in the morning and supplement the process with plenty of refrigeration time. I suggest starting with a small quantity and seeing how it goes!
– Joe
Thanks Joe. Will try and let u know the results.
Please do!
I made a batch of puff pastry using a different recipe (king arthur flour’s) and a slightly different folding technique. It turned out well for the most part.
I had some problems with the dough falling when used in an individual (4″) metal tart pan. I also had problems with the dough blowing up like a balloon when baking a rectangular tart. I ended up just popping the bubble with a knife mid bake and the result was satisfactory, but I’m wondering what caused these two problems and what I should look for next time.
Hey Chris! When you say “falling” do you mean shrinking up? Regarding the ballooning, it’s best to dock the dough (poke a few holes with a fork) when using it as a tart base.
– Joe
Yes it did shrink somewhat but also just sort of sagged down the side of the tart mold. Too much water? Stretching the dough? I tried to avoid both, but who knows.
With the rectangular tart base (no sides to fall), would you pre bake the shell? I tried one that I “docked” as you say, but then it still ballooned up, maybe because the filling filled up the holes.
I tried pre-baking and docking one of my 4″ tart shells and it turned out even (no balloon), but not very flaky, almost like a cracker. Maybe my oven temp was too low?
I guess I was wondering if I made a mistake somewhere in the rolling process. But if you think these other variables are at fault, I suppose all I can do is try again.
Thanks for your time.
Hey Chris! That sagging is probably shrinking in disguise. The dough circle is getting smaller. The problem is that the dough needs to be rested once it’s been rolled so the gluten relaxes and doesn’t snap back during baking. Ideally you want to rest it at least half an hour (an hour is better) any time you manipulate it al all. I know that sounds obsessive, but that’s how superior baking gets done.
And yes, docking only works if you’re pre-baking the crust. Otherwise as you point out, the filling just soaks right in. I think pre-baking makes sense as a rule, since it keeps crusts crispy. If you’re using a laminated (puffing) pastry, it’s a must.
As for how much you dock, you’ll have to experiment a little to see what you like. A little, a lot, or somewhere in between depending on how puffy you like the finished product.
Keep me updated on how things go!
– Joe
I am wondering if its possible to acheive a similar effect with margerine. I know, almost sac religious, but my daughter is allergic to dairy, soy, etc. would it work better to brush on melted margerine at each turn instead of trying to for a packet- which would be too soft, and ooze out everywhere…
Hi Karen!
Indeed margarine works just as well — over half the croissants in France are made with margarine these days! Definitely don’t melt it, however. Simply follow the directions as if you were using butter and all will be well!
Cheers,
– Joe
Hello Joe!
Thanks so much for your informative site. I made the croissant dough (three turns), used 1/3 and froze the other two pieces of dough. What I am wondering… after defrosting the dough can I then add 3+ more turns to achieve the puff dough or is it now done? Should all the turns be done before freezing?
Thanks!
H 🙂
Hey Holly!
Nice question. In fact you can’t really turn croissant dough into puff pastry, since puff pastry has no yeast in it. So it will definitely be a different thing. That’s not to say you can’t add turns if you feel like trying it. Just make sure the dough is completely thawed before you attempt it. Let me know how it goes!
– Joe
Wow such a duh moment – I knew that! Yet I had puff stuck in my head from reading above. I thought huh maybe there is another that I am not thinking of – ok will try that…. ummm nope it is technique I am reading. Check! Ok moving on now.
Once again much thanks for your info! Overnight defrost of the other two pounds of dough, rolled out and half stuffed with chocolate and the other half cinnamoned (new technical term) apple sticks.
I may have to hide that batch.
Cheers!
H
Whoa…you just might! Happy baking!
– Joe
Hey Joe,
Just had a quick question, I’m making croissants and had a quick question about this lamination procedure. After you have performed the first letter fold and need to then roll the rough out a second time, which direction do you roll it out?
Kind of a confusing question, but looking at the last picture of the post, would you then roll that dough out from top to bottom (the opposite direction as the first roll) or left to right (the same direction as the first roll). I’ve read elsewhere you want to develop the gluten in different direction and thus would go from top to bottom?
Hey Dallas!
Interesting question. Believe it or not, it really doesn’t matter. I do start out by rolling it from top to bottom at that stage, but only because it’s easier for me to spread the dough that way. The effect on the gluten would be the same no matter which direction I rolled. You do see different recipe writers getting almost mystical about details like the rolling direction, but in the end it really doesn’t make a difference. The big thing you want to achieve in the rolling phase is an even layer of butter…that’s really it. Whatever technique works best for you in that regard is the one you should use.
Thank you very much for the question. Let me know how the laminating goes!
– Joe
Hello Joe – just curious. I don’t make this often, so I decided to try it today. The butter was oozing out the pastry, and I can assume the temperature was too high. So now the pastry has blobs of butter here and there. Is there a way to rectify the current pastry that I have?
Hi M.K.!
A few blobs won’t hurt anything. Just press on. It takes practice to perfect the technique, but you can’t go too wrong with it. Bst of luck with the last couple of turns!
– Joe
Hi Joe!
I came across your site looking for the how to on danish. I made danish awhile ago, not too ugly for the first time. But there were lots of room for improvements. I tried laminating the dough envelope style after spreading the butter on 2/3 of the dough.. but perhaps i rolled it too thin so there were small holes here and there and the butter leaked. The taste was oh so good, I ground some cardamom seeds and sprinkled it on the dough, so I guess I’m forgiven, eh?
Anyhow I was thinking.. If the difference between danish and puff is in the use of yeast, can I still use the technique of making puff pastry like you photographed above ( covering all the butter with the dough, seal by pinching, then roll and do the envelope thingy) for making danish pastry?
I mean since it’s sealed properly, unlike the 2/3 butter spread, the butter have a smaller chance to leak than just spread and fold.
Thanks a bunch!
Hi Amy!
And welcome. Yes indeed I start all my laminated doughs this way: Danish, puff pastry, croissant, etc.. I think it creates the most even butter layer. So yes, by all means! And let me know how it goes. Kudos to you for making your own laminated dough. Not many people have the courage to take on a project like that, but as you already discovered it’s not so hard. And if it doesn’t quite work out it’s still delicious! Let me know if I can be of help in any other way.
– Joe
No holey holes! YAY!
I just made a danish using your recipe with the seal and pinch. I took my time and refrigerate between turns. Though I think I made too much turns.. Lol..
Well, practice makes perfect and I’m gonna keep on doing it until I’m confident with it.
Though I did use 1 cup AP flour and 1 cup whole wheat out of curiosity and only 150 gr of butter not 227 gr (10 ounces as the recipe stated) because I ran out of butter.
Thanks a million!
Great, Amy! Let me know how it bakes!
Congratulations!
– Joe
Hi Joepastry,
I’m going to take my first crack at croissants this weekend. I have lots of bread-baking experience and I’m OK at it, but I feel like it’s always just a little too dense. What is the most important step in the dough-making and/or lamination process with croissants to ensure I get a light, flaky texture? Bread is no big deal to me anymore (I can always just smear chive-butter on it anyway), but if I invest all the laminating time and effort and end up with little seashell-shaped bricks, I’ll be very sad. Thanks in advance for your insight (in advance).
-Liz
Hey Liz!
Laminating always takes practice to perfect, but it sounds like you’ve got a great head start! Getting the right butter consistency is the big thing, I think. After that, not proofing too long. That’s where most people go wrong. Let me know how they turn out!
– Joe
hi joe . i want to know . how many folds in the puff party . like one is book fold .. plz tell me other type of fold if u know …
Hello!
I only know two types of folds: the 4-ply “book” fold and the 3-ply “letter” fold. I think that’s it!
– Joe
well this is the 2nd attempt i tried to make puff pastry, and luck against me this time around. the 1st attempt to butter a chunk of butter break through the dough and the dough itself are not elastic enough. the 2nd time same thing happen but i manage to the first fold but then after i spotted a few butter breakthrough and uneven butter spread through the dough but i know this time it not the problem with de trempe but the butter temperature. what is the best butter temperature for starting? should i put it during hard & cold or semi hard. it appear i cant get semi hard it well melted instead.
Hello Aliff!
I can’t tell you an exact temperature because the melting point of butter varies so much. You want to beat on it with the pin and work flour into it until it feels like clay. At that point it’s safe to proceed. But do use the dough you made just the same. I’m sure it will bake up well. Keep practicing! You’re doing something few people dare to attempt these days. Keep at it!
– Joe
You are the book !! Excelent job.
Thanks Mr. Zee!
– Joe
Hi,
Wish I had found this site yesterday!!!
Just finished first attempt at Danish pastries, and it has been a bit of a disaster. Rolled folded and chilled five times, spent time making pinwheels, home made creme patisserie, put them all together with raspberries and baked.
They have turned out “bready” with very little flake.
Any ideas?
Taste lovely, but not Danish pastries!
Cheers…
Hey Mike! Sorry to hear about the disappointment. If they didn’t rise well or fluff in the oven there might have been a rolling problem (perhaps the butter was too warm) or maybe they proofed for too long before they baked. Keep trying! These sorts of things take practice.
– Joe
At last…! I think I’ve got it!
Woohoo!
– Joe
Hi,
Just a question i am making Flaky Pastry for the first time, but after rolling for the 3rd time (resting in between) i can still see my butter, my butter wasn’t flattened the recipe i am using said add diced butter, anyway can i still use it or will i have to start again, or keep rolling until i can’t see it any more?
Hello Morag!
You absolutely can use it. Try resting it at room temperature for half an hour or so before giving it a final roll, to encourage some flattening and spread. But it should work fairly well even so. Kudos to you for trying laminated dough…not many people have the courage! The next batch will be better still.
Cheers,
– Joe
Hello!
I am attempting to make my grandmother a napoleon for her birthday on Wednesday. I need this puff pastry, but since I am not that experienced in the world of pastries yet, do you think that I should just go the store bought way, or is the homemade one of those it-is-so-much-better-than-store-bought kind of things?
Also what does “turning of the dough” mean?
Thank you with all your help, I am really interested in learning more about the art of baking “European” style!
Hey Teddi!
A “turn” is just a fold, nothing more than that. Honestly I don’t know why it’s called that…it’s confusing.
Regarding your project, it seems to me that store bought might be a better choice if you’re making napoleons for the first time. They have a few different components and laminating the dough is probably the most difficult. Why not use store bought pastry this time, and if everything goes well make it from scratch the next time?
– Joe
Joe,
I am trying to bring scratch Danish to our menu at my bakery, and I trust you enough to use your recipe. I tried it out today but noticed that the dough was a little softer than croissant dough (lack of butter in Danish detrempe) and during my first sheeting attempt some of the dough kind of glided over the butter and collected on the ends instead of moving with the butter. Am I doing something wrong? Too cold of butter? Dough too warm? I was able to complete three folds but the butter was blotchy and I trimmed off quite a bit of junk.
Please help! You can send me an email too! 🙂
Hey Aaron!
I’m flattered that you’re using the recipe…I hope it works out for you. I understand the problem having made this dough in batches up to about ten pounds. Sometimes you do get those lips out on the edges, especially in the first coup-le of turns. My suggestion is to go a lighter on the butter — cut it down by maybe 20% — and also be sure it’s nice and plastic before you roll it. Also make sure you’re sprinkling some flour on the butter pat as well as working it in. This helps it adhere to the dough layers.
Keep my apprised of your progress!
– Joe
hum…. after reading the instructions… and then the post….. I’m tired. Can I just come over and eat at your house?
Dinner is at six, Virginia!
– Joe
hi! joe can i apply this technique for my croissant donuts? been frustrated many times cause my croissant donuts doesn’t stay crunchy after frying it.hope you could help me with this. thanks!
Hi Carol! This should work well…though my thinking on cronuts is that you’ll need to use margarine instead of butter here so steam doesn’t blow them apart. I haven’t tried making those yet, but that’s my thinking! 😉
Cheers and good luck!
– Joe
Hi! again does incorporating water in the dough makes any difference? coz the ingridients i’m using doesn’t have water only milk. thanks! 🙂
And Joe some have eggs and other recipes need eggs.Does it make any difference? Thanks so much!
Hey Carol!
Again, it’s mostly just a matter of preference. Eggs add color, flavor and a little more fat, but then there’s plenty of all that in laminated dough once the butter goes in. It’s really a judgement call.
Cheers,
– Joe
Hi Carol!
Milk and egg whites are mostly water, so as long as the dough is decently hydrated, one is as good as another!
Cheers,
– Joe
Thanks Joe for patiently answering my questions. 🙂 More power Joe!
My pleasure, Carol!
– Joe
Hi Joe-
I love your site and have used it for a few recipes. I actually took a pastry class in culinary school and this tutorial is better than the explanation we had in class! I have some croissant dough waiting in the fridge right now for a final turn. Two questions…one, you say to refrigerate the dough “at least” 4 hours before using–does that mean I can refrigerate it longer and then just proceed as directed? Er…overnight perhaps?
Two, you mention that the dough can be frozen. Can you also freeze the already formed, unbaked croissants? If so, do you recommend proofing first, then freezing? Or is it better to bake them and freeze after baking? Thanks so much!
Amanda
Hi Amanda!
Sorry not to reply immediately. You can indeed rest the finished dough in the fridge for several days of necessary. If you need to store it more than 3 days, freeze it instead. You’ll want to freeze it in either an un-shaped block or just after you’ve shaped the individual croissants. Definitely don’t proof them before freezing. You can freeze shaped croissants, then thaw them in the fridge overnight, then proof them before baking. Since they’ll be cold you’ll want to add an extra half an hour to the proof time.
Thanks for the generous compliment…let me know how they go!
– Joe
I found your post today when researching danish pastry making because my first batch was a dud. Then I followed your directions and the dough came out much better, but I want it to rise more, the cooked pastry was very flat. I have a warming drawer in my oven and used that to proof, but didn’t compensate for humidity. I can put a cup of hot water in next time.
Also, won’t the butter between layers melt in the proofing process? I saw in one reply you said that the dough might have been too warm when put into the oven. How do you keep the butter from melting AND proof in an 85-90 degree oven? Do you put the dough back into the fridge before baking?
How can I get a nicely risen final product?
Thanks!
Joan
Hi Joan!
Proofing is usually best done on the countertop with these, for reasons you mentioned. Some butters melt under 90 and that can ruin the layers as you point out. I’d avoid the warming drawer since the bottoms of those things can get very hot. Just let it go on the counter is what I suggest. Glad the recipe helped the effort though!
Cheers,
– Joe
I put the pastry in the drawer, but didn’t heat it, and added a teacup full of boiling water for moisture. This turned out much better, nicely risen and airy layers, just like it is supposed to be.
thanks!
Well OK! Sounds about perfect. Glad it worked so well!
– Joe
Hi joe! Just came from the kitchen where my first ever batch of croissants is just out of the oven…didnt turn out well, though. I saw something was wrong when the butter didnt sort of roll with dough. My guess is, it was too cold. So during baking it just oozed out and now i have buttery heavy oily things that i cant fix and cant eat :-/ advice for next time please
So sorry to hear that, Mahwash! My suggestion is to let them cool and eat them with tea in the afternoon. With this much butter there is no losing, only degrees of winning as I like to say. If the butter did form big hunks during the rolling process there’s only one thing for it: let it get more plastic net time. Keep practicing! Laminated doughs takes some work to master or everyone would make them. Congratulations on having the courage to take them on! Net time will better, please keep me advised of your progress!
Cheers,
– Joe
Thank you for showing us how to do this.
I think you presented this in a way that I may
Be able to actually make it.
It’s my pleasure, Mar! Let me know how yours goes!
– Joe
Hi Joe,
This is a great tutorial! I’m inspired to finally try making croissants. However, I don’t usually have plastic wrap in my home. Would it work to pound the butter between two silpats, or is there something special about the double-layered plastic wrap?
Thanks for the great blog,
Lovica
Hi Lovica!
There is nothing special about the plastic other than it let’s you shape the butter pat. Try with silpats or just keep flouring your pin so it doesn’t stick in the butter. Let me know how it goes!
– Joe
I grew up in Racine, Wisconsin which is known for it’s Kringle, (google, if not familiar). We left there when I was 12 and haven’t found a Bakery to match. My mother made a simple one, my brother and I have competed for years to duplicate. I am now 81 and came close 12 years ago when I learned to layer. My method is similar to yours except that I roll out the butter and letter fold to achieve 24 layers. My big problem is when I fold over the dough to cover the filling it does not stick together, I have used both water and eggwhite to seal without success. Also my dough comes out tough. Would appreciate your help, new to your site and glad to find someone who cares and willing to help.
Fred
Hey Fred!
Nice to meet another kringle fan! If the dough is tough and not sticking to itself I’m thinking you may need to let it rise a little more…develop a little more volume and pliability. What shape do you make the most? The pretzel or the fold-over?
– Joe
OMG, here’s another one I have been looking for “Kringle”!! Do you happen to know a good recipe for the filling?
So many fantastic comments and responses on this site. You are so very helpful it’s unbelievable, thank you so much!
Hello again Annette!
I have all sorts of filling recipes on the site. I used raising filling for one of the kringles, it’s right here:
http://joepastry.com/category/pastry-components/fillings/bake-in-fillings/raisin-filling/
I used chopped chocolate for the other. Look under “Pastry Components” and then “Fillings”. You’ll find a large selection.
And thanks very much. I love what I do and am always happy to help a baker in need! 😉
– Joe
Thank you so much!! I will make some of these when I get back from vacation in March and let you know how they turn out 🙂
Excellent. And please do, Annette!
– Joe
I gave up on the Oval years ago and do a strip. I am trying your method of working some butter into the flour, and got some European butter. I let it rise well before baking and even in that process it opens up, I am going to try lapping it more. Does kneading the dough make it more tender, if so, how long? This is my annual contribution to the Christmas gathering and gifts to friends. Thanks again for your advice.
Hi!
I’m a culinary arts instructor (who is still learning many things) and I’m having trouble with the puff pastry recipe. We made it in class the other day and found the butter leaked out during cooking and the dough was extremely tough. Both of my groups had the same result with their turnover and cream horn batches. Any advice?
-Jenn
Hey Jenn!
I’d be delighted to help in any way I can. Regarding the leaky butter problem, that often happens when the dough gets too warm and soft before going into the oven. Could that have been the issue? Also when you say the dough was tough, do you mean that it was firm and hard to roll? If that was the case then the détempe was mixed too much. A lot of gluten was developed, the result being elasticity and toughness. Does that seem likely? Let me know and we’ll keep working through the problem.
Cheers,
– Joe
Dear joe,
I wish i saw your post earlier.
I followed this recipe and failed miserably.
Wish i could send you pictures of the finished toast.
Its soggy (looks like the dough absorbed the butter) and the dough tastes a little sour.
what have i possibly done wrong? Many thanks!!!
Hi Mabel!
So sorry to hear that! What was the temperature like in your kitchen at the time? That might be a good place to start.
– Joe
Sorry joe, i forgot to post the link
http://www.ploetzblog.de/2012/03/28/croissant-brot/
I troed to make a danish toast following this recipe.
The temperature was around 15 to 21 celcius.
Is danish toast one of the more difficult pastries to make?
I tried to palmiers using your recipe and they were perfection. So i just wanted to try more variations.
Do you have a recipe for danish toast so that we could follow?
Thanks!
Hello Mabel!
That’s interesting, I’ve never seen Danish dough treated this way, but there’s no reason that it wouldn’t work. Not that I can think of at least.
Often laminated doughs fail in the oven because they were “over-proofed” meaning that the second rise was too long. The butter gets too soft, the pastry gets too fluffy and the two melt into each other in the heat. The result is sort of a flat and greasy mess. Could this have been the problem do you think?
– Joe
Yes joe, i think that is it!
I proofed it for 10 hours the sdcond time.
Also, its harder to roll out the dough making this bread, because kneading made the gluten develop. Do i need to knead the dough till gluten develops in this recipe?
Hello Mabel!
Glad we solved the problem to some extent (10 hours is indeed a long time). Regarding gluten formation, you don’t need to go out of your way to knead the dough, you’ll get plenty of activated gluten in the process of preparing it. The more you can rest the dough between steps, the more the dough will relax and the easier the rolling will be.
Best of luck on the next try!
– Joe
Hi Joe:
Just found your wonderful tutorial. Thank you so much for your time and effort–it means a lot to people like myself. I have a little story and I hope it will make you laugh.
After years of living in a too small kitchenette we were finally able to move and I had a nice little kitchen, so I began my pursuit of baking.In 2009 I took a class at Sur La Table cooking school. The class was about doing croissant dough. We worked in teams of two and my team mate and I worked hard through the day and created some wonderful dough. After reading your instructions, I now understand that the recipe we used was big enough for each of us to take home a batch about the same size your recipe makes. It was a very warm day turning into summer. At the end of the day my teammate said she did not want her batch and gave me her share to take home as well as my own. DH picked me up at about 5:00PM and I carefully placed my arm load of dough into the trunk of the car. We had to go to dinner at his boss’s house, so we went straight from the class with the dough in the trunk of the car. It was a 4 door older Buick–quite large trunk. I knew nothing about dough. When we got home that night and opened the trunk to take out my treasure the dough was HUGE. So big that it covered over most of the trunk and I think it was 2 ft deep !! I have practiced making a lot of bread since then and can do a very fine pan of cinnamon rolls–I give them to the cowboys on the ranch next to our little cabin and they help with the fence and keeping the drive clear. Anyway, after finding your site today–I am going to try again! Only took me five years and Joe Pastry to get up the courage! Any suggestions will be much appreciated!
Best,
Hehe…hi Annelee!
I did very similar things when I was learning…though never put it in my car! Great story.
Let me know how the new dough turns out as I’ll be curious! Cheers,
– Joe
Will do. We are home now in Montana and there is still a lot of snow on the ground. I have good stores soo. . . will get back to you in a few days!
Thank you again,
Where have you been all my life!!!!!!!! Thanks so much for sharing you knowledge! I’m so excited to try this recipe. I’ll be here often!
YOU ROCK!
You made my day, Eve!
Welcome aboard and don’t hesitate to ask questions about anything you find here. Questions are the life blood of the blog, plus I pretty much just like to help people with their baking!
Cheers and nice to know you,
– Joe
Whenever I want a recipe and techniques on ‘tougher’ bakes like this, I just google Joe Pastry and search for it. Then I read your instructions, laugh at the light heartened manner you write them in, and am ever so thankful for the accompanying pictures to tell me if I’m doing anything drastically wrong.
THANK YOU, YOU ARE A SAVIOUR.
Ha! You made my day, Amber!
Cheers and keep me up to date on your projects! 😉
– Joe
hey Joe, just found your website the other day when i was looking for a good danish pastry recipe after the ones i made in foods class turned out so good, however the one i made in foods class followed an easier method so I’ve never made dough like this before. i was wondering how much butter i should use for your danish pastry recipe? i doubled the recipe and 8 ounces of butter still seems like a lot haha
so after reading some articles on your website more thoroughly i decided to go ahead and try to make the butter slab with a pound of butter and im having problems getting it to the right consistency. its still very… well butter-like haha, i have it in the fridge right now still in the plastic wrap, will that do the trick or should i add more flour?
Hey Josh!
Sorry not to be around for the process. These things can take some practice. It will be very buttery of course , you want a semi-firm consistency that feels plastic but not greasy. Don’t know if you’ve proceeded…let me know how everything went!
– Joe
so after a bit of trial an error i finally managed to work it out and they came out amazing, maybe a little too tough but everything else about it seemed on point. Now im gonna go check out some more of your website haha, ive always wanted to learn to make home made bread after hearing what goes into store bought bread. Thanks for your help and the awesome recipes!
Hey Josh!
You amaze me. You starter with the toughest stuff! Now bread should be easy for you, for in truth it is easy. Start with the pain à l’ancienne, you’ll love it.
– Joe
Hey Josh!
Just double everything and you’ll do fine. There’s no such thing as low-fat Danish pastry! 😉 All the butter not only makes it delicious, it lubricates the dough sheets so they can separate and rise.
Let me know how it goes!
– Joe
Hi Joe,
Because butter is hard when cold and melts easily at room temperature, what precautions are necessary when using butter as the rolling-in fat for laminated dough? please help.
Hello MS Dee!
This is the second question I’ve received that uses almost identical language. Is there an exam going on? 😉
To answer your question: beating flour into the butter helps to insulate the butter against premature melting. Also we refrigerate the dough after each turn (or two) to make sure the butter stays cool, but not so cool that it hardens.
Does that help?
– Joe
I meant “beating” 😉
– J
Joe
Discovered your site yesterday, and you really made me feel good about myself when you praised people for even attempting to make laminated dough. I made my first Danish nut rings when I was 16, almost 40 years ago, and they turned out beautifully. Guess I was too young to be scared. Only made the rings a couple more times soon after that. Even my husband has never tasted them, and we’ve been married 32 years! So now I want to make individual pastries for my coworkers and am almost paralyzed with fear because they seem more fraught with potential disaster. I am also worried because I can’t find instant yeast in local stores & don’t have time to order online. How do I compensate for using rapid-rise? Love your down-to-earth style of instructing and the plethora of information on ingredients & techniques.
Hey Vanessa!
First rule of baking: don’t fear the pastry! 😉
Kudos to you for taking this on, and I’m sure you’ll be delighted with the results. Even imperfectly laminated dough is a revelation in this day and age when so few people do it. You may have seen a note here about a woman from Denmark that I once knew, she cherished my home made Danishes because she said no one — even in Denmark — made Danishes from scratch anymore. I’m sure you’ll love these.
The conversion is easy. Rapid rise just needs to be mixed with warm water or milk. All you need to do is warm the milk to about 120 degrees Fahrenheit, mix in the yeast, wait about five minutes for the mixture to start looking foamy, at proceed as normal. Let me know how they turn out and send pictures if possible!
Cheers,
– Joe
Hi, I’ve gone under a major problem in making my own puff pastry.
After laminating the butter dough, wen I rolled them to fold again, the butter din’t even sync in the flour dough, now there bits and pieces of Butter all over my pastry.. How temme how do cover that up and turn into a proper puff pastry??
Hello Mubaraka!
It sounds like the butter needs to be a little warmer before the rolling. Do you think that could be the problem?
– Joe
Check above, you say to “transfer to a sheep pan”
Sheep pans all the rage on the Continent, Mary. Haven’t you heard of them? 😉
Many thanks. I’ll fix that. Or maybe not! 😉
Cheers,
– Joe
Hi Joe,
!Thank you for your laminating information. Timely I must say. I had a thought of making fresh croissants for my family on Sunday and not having made them previously, looked up the laminating process on Google. Would you like a copy of your instructions? I have two copies and at 67 pages it has taken almost an hour to finish printing. Oh dear, I am so new to these things called website technologies….I am now joining your team of students in the making of pastry it. I was full of confidence until I read the reports…shall try it and let you know results (I will also go buy some just in case) and be on the safe side….Thanks again for the information it is great to be able to access these things immediately.
67 pages???
Holy cow. I guess that’s with comments and everything. Good gracious.
But good luck with the project and I agree, it’s always good to have a backup plan. Send pictures if you can!
Cheers,
– Joe
Do you have the recipe for the ingredients that you used on the dough along with the amount of butter that you used. It looks like maybe 3 pounds of butter but i’m not sure.
Thanks,
Crista
Hey Crista!
Have a look under the Pastry Components menu. There are recipes there for puff pastry dough, Danish dough and croissant dough. Let me know if you have any questions about any of them!
Cheers,
– Joe
Joe, may I say what a blessing you are to my kitchen! Thank you so much for this wonderful picture filled tutorial! After much researching I’ve built up the courage to make danishes and now I know how to! Let’s just say I’m about to surprise my entire family this upcoming Saturday!
And might I add that you’ve inspired my baking passion to transverse from more simple cakes and cookies and cream puffs, to the more difficult and impressive pastries! Thank you very much for inspiring this 18 year old Canadian girl!
Hey Shanley!
Thank you very much and please let me know how they turn out. I’m very pleased to be of help in your pastry explorations. Keep me informed of your progress. And may I add: way to go!
– Joe
thank u v.much for a perfectly detailed recipe of puff pastry with pictures.so far the best tutorial I av come across.v.inspiring.i have done this twice before folliwing another recioe but both times while rolling after sealing butter butter Ooze out.but continued rolling n refrigerating for 6 times n then baked.it did rise somewhat n was bit flaky.but not satisfactory.pls help me joe.i wud love to make puff pastry one day perfect without the butter oozing out while rolling..pls help me.thanks to u in adv.waiting for a quick reply
I just want to say thank you! Making these for the 3rd time. My family loves them. The instruction is very much appreciated
Thanks for your site. I have made dough and danishes twice. Takes time but love the results. 🙂
Question – on another site, it suggested taking soft butter, mix with about the same amount of flour you suggest but mix in a mixer and then flatten out on plastic and pace in frig to harden before placing on dough. Do you see a problem doing it this way? Thank you