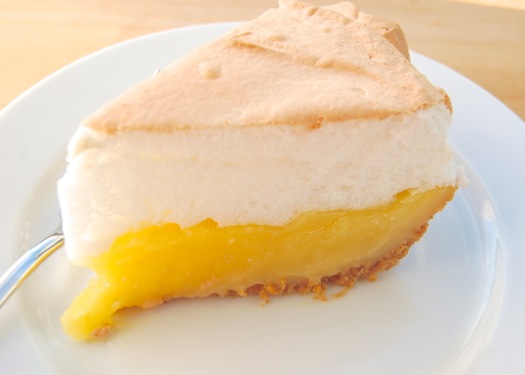
Category Archives: Pie

Making Pumpkin Pie

That’s how I like a slice of pumpkin pie: well lathered in semi-whipped cream. Pumpkin is my favorite pie by a Kentucky mile. The fact that it’s relatively low in calories and packed with nourishment only makes it easier for me to rationalize a second or third piece.

Pumpkin has always been one of the easier pies to make: roll the shell, mix the filling, pour the filling and bake. Here I’m complicating matters a bit, but the payoff is big, so please indulge me. Hm. Ever notice how I like to simplify the complicated and complicate the simple? Something I’m just starting to learn about myself. But let’s continue.

Prepare your pie dough according to these directions. When you’re ready to shape, roll it and rest it according to these other directions (though this obviously isn’t a double-crust pie). When that’s done you should have a rested-and-ready pie shell, all set for pre-baking:

When you’re ready to pre-bake, preheat your oven to 375. Then gently press some tin foil into the dough-lined pie pan. This is where one of those extra-wide rolls of foil really comes in handy. Make sure to gently curl it around the rim to protect the edges of the crust.

Now pour in whatever sort of weights you want. I use loose change, myself. Yes I know it’s dirty, but I’ve never met a germ that can drill through a sheet of heavy-duty tin foil. If you have call the CDC immediately because we’re all doomed.

While the crust is baking get your filling together. Combine the pumpkin, sugar, salt and spices in the bowl of a food processor and give it a spin for about 45 seconds. This really creates a silky texture.

Scrape the mixture into a saucepan…

…pour in the milk and cream…

…and whisk the whole thing together. Like that groovy Trudeau whisk? I never thought I’d fall in love with a silicone whisk, but now I can’t put it down. And in answer to your question, yes, they sent me that as a gift. That’s partly why I’m saying nice things about it. Send me something nifty and I’ll say something nice about you, too. The Joe Pastry Receiving Department never closes.

Put the filling on the stove over medium-high heat. In a few minutes it’ll start bubbling like volcano lava. Whisk it for about 30 seconds and remove it from the heat lest it cover your stove top with goo. When the crust has baked about 25 minutes, remove it from the oven and gently lift out the foil and the change (the edges of the foil will cool almost instantly). Return the shell to the oven to bake another 5-7 minutes until it’s just barely browned (it may puff up a little, don’t worry, it’ll settle back down).

After about four minutes, return the filling to the heat. When the finished shell comes out of the oven, set it on the stove top. The filling should be bubbling again. Turn off the heat, add the eggs…

…and whisk it good.

Promptly pour the filling to the shell. What’s the deal about a hot filling and a hot crust? Because that speeds the setting of the eggs — if all goes perfectly it starts to happen right when the filling and shell come into contact — and that helps keep moisture from soaking into the bottom crust. But I digress.

You may have some left. Part of the reason is because there’s air in the filling from all the processing. Usually the filling in the shell will settle after about ten minutes. At that point you can reach into the oven an pour some of this on. Or not. It’s up to you. Apply a crust protector to the pie and bake about another 20-25 minutes unit the filling doesn’t slosh but jiggles when you jostle the pan.

Why do I love crust protectors?

Because they prevent crusts — especially pre-baked crusts — from over-baking. See?

Let the pie cool for at least an hour before slicing and serving. Warm pumpkin pie is one of those little slices of heaven we all hear so much about. But I love it cold as well. After an overnight rest the flavors mellow to perfection. You can store the finished pie at room temperature for a day or so, in the refrigerator after that.

Filed under:  Pastry, Pumpkin Pie | 31 Comments

Pumpkin Pie Recipe

Is there a trick to a good pumpkin pie? Yes, in fact there are a couple of them. Pre-baking the crust is one, keeping the filling warm-hot until the pie crust is ready is another. Combined, these techniques keep the crust from getting soggy. Other tricks include using a contemporary deep-sided pie pan, which will help eliminate cracking and weeping (for more on that see upcoming posts). For this recipe (which I swiped from Cook’s Illustrated and changed to suit my tastes) you’ll need:

1 recipe pie dough for a single-crust 9-inch pie
16 ounces (2 cups) canned pumpkin
7 ounces (1 cup packed) dark brown sugar
2 teaspoons ground ginger
2 teaspoons ground cinnamon
1/4 teaspoon ground cloves
1/2 teaspoon salt
2/3 cup heavy cream
2/3 cup milk
4 eggs

Prepare the pie dough according to directions, a day ahead of time if you prefer. Roll and rest the dough according to the directions here. To pre-bake the crust, heat your oven to 375 degrees Fahrenheit and place a rack on a lower-middle position. Lay a sheet of tin foil over your dough-lined pie plate, gently folding the edges over to shield the edge of your crust. Pour pie weights, dried beans, uncooked rice or loose change into the shell. Put the pie plate into the oven and bake for 25 minutes. Gently remove the foil and weights. Bake the shell another 5-6 minutes until the crust is lightly browned.

While the pie shell is baking, prepare the filling. If you have a food processor, process the pumpkin, sugar, salt and spices all together for 1 minute to chop up any bits of tissue and give the pie a silky texture. If not, just mix them thoroughly in a bowl. Pour the mixture into a medium saucepan and heat it over medium-high heat until it starts to simmer, and cook it for about 5 minutes. Reduce the heat to medium and whisk in the milk and cream. Bring the mixture up to a simmer, the turn the heat down to low until the shell is ready. Whisk the eggs in a bowl and have them standing by (since your food processor is dirty already, you can process them for ten seconds in there if you wish).

When the shell is finished, remove it from the oven. Take the pumpkin mixture off the heat and promptly whisk in the eggs, then pour the whole mixture into the hot shell. Bake about 25 minutes, until he filling doesn’t “slosh” when you move the pan, but jiggles. Cool the pie on a rack for an hour before serving.

Filed under:  Pastry, Pumpkin Pie | 18 Comments

Making Mince Pies

There’s a lot of joy in a mince pie — especially if the mincemeat filling contains real meat. Sure, the anti-mince pie crusaders of a hundred years ago claimed they caused insanity. But you’re not going to let a little thing like a psychotic break get between you and a handsome snack, are you? I thought not.

For four of these bad boys you’ll need 1 recipe of pie dough, plus 4-5 cups of mincemeat. Start by preheating your oven to 350. Apply about half your dough to a lightly floured surface.

Roll it out according to the more detailed directions supplied here. Then cut out circles to first your molds. I have an actual mini pie pan, but you can make these pies in muffin tin if you wish. My pan from Chicago Metallic makes six 4-inch pies, so I have a 4 1/2-inch cutter (for the tops) and a six-inch cutter (for the bottoms). You can also make these circles freehand with a pizza cutter, using cardboard or paper templates.

Re-roll the scraps, working them as little as you can, until you’ve got as many shapes as you can get. Do the same thing with the other half of your dough.

Lay the bottoms into your pan, then put the pan into the refrigerator (along with the tops) for an hour. This will help relax gluten and minimize shrinkage.

Next, fill the pies with cold mincemeat.

Put on the tops.

Press the edges down firmly.

Crimp the tops.

Cut steam holes in the tops (wiggle the knife back and forth a little to make sure you have a good opening). Now rest these guys in fridge again for another hour. I know, I know, but do you want the dough to shrink up or not?

Bake 30-40 minutes until they’re a nice golden brown on the top.

Let them cool completely, then de-pan them by gently rotating the pies in the molds and carefully lifting them out.

Eat! But you know, not so many that you die.

Filed under:  Mince Pies, Pastry | 2 Comments

How to Make a Pie

A double-crust fruit pie to be precise. For double-crust pies are made by a slightly different method than open-faced pies. Unlike open-faced pies, double-crust pie crusts are not “blind”-baked (i.e. partially baked without the filling inside). Thus extra measures have to be taken to prevent the bottom crust from becoming soggy. The filling is treated a bit differently vis-à-vis an open-faced pie, and it’s baked lower in the oven at a higher temperature.

The thing that prevents so many talented bakers and cooks from attempting homemade pie is fear of crust. Rolling crust, moving crust, shaping crust…it terrifies people. This comes, I believe, from too many bad experiences working with ultra-dry dough that crumbles at the merest touch. What aspiring pie makers need to know is that a dough need not be that dry. Recipe writers, though they try, have no way of knowing if, say, the flour you’re working with is especially dry (oh yes my friends, sacks of flour can have different moisture contents). Thus you should use your own judgment when making your dough. If it seems just horribly crumbly after you knead it, add another teaspoon or two of water. The idea is to give it just enough to keep it together. Then, after a nice long rest in the fridge, the flour granules should be hydrated enough that it rolls out smoothly.

Another misconception most pie bakers have is that a dough must be rock-hard, right out of the fridge when you start to roll it. Nonsense. A few minutes at room temperature or a little patting between the palms to loosen it up is fine. You just don’t want it warm and greasy.

I realize of course that these reassurances still won’t be enough for a lot of folks, especially when it comes to picking the dough up and shaping the crust (they fear they need one of those silly giant pie spatulas). Which is why I decided to demonstrate crust rolling using a fool-proof method: plastic wrap. Seeing how easy this is, you’ll probably decide you don’t need to the reassurance of wrap the next time, but we all need a little security blanket every so often, yes?

So then, start by laying down two sheets of overlapped plastic wrap on your cutting board like so:

Flour it well, then put down your ball of dough (half the original ball…remember this is a two-crust pie), then dust again with flour. You’ll want to use a bit more than I’m showing here to prevent sticking…but I wanted you to be able to see what I was doing.

Now, apply another double-wide, overlapped sheet of wrap on top, and roll it a little to get warmed up:

Here’s another point of anxiety that’s common: how can I be sure to roll a perfectly round crust? Simple. Roll it a little in one direction…

Then turn the crust (or the board), and roll it in the other direction.

Getting some tears? No problem. Just moisten your thumb a little bit…

…and stick’em back together.

Is the crust sticking to the wrap? Then just peel back the plastic and add more flour. Four or five minutes later you should have a nice round piece of dough. Now just peel off the top layer of plastic…

…and flip the sucker onto the pie plate.

Trim off the excess dough and you should have something like this:

Put a sheet of plastic wrap over it and put it in the fridge while you roll out the other piece for the top crust. Once that’s done put the top crust, plastic and all, into the fridge as well. Let both pieces rest for an hour.

In the meantime prepare your filling. In this case my filling is peach. I combined six cups of sliced peaches with four ounces of sugar and a pinch of salt in a bowl. Then I let the mixture sit in a colander (over a bowl) for half an hour, and collected the juice that it released (which was about half a cup). The juice I reduced down to a syrup in a small saucepan (about five minutes at the boil). Sound like a lot of extra trouble? Eh, maybe it’s a little extra trouble, but it keeps the bottom crust from getting sodden and retains a lot of great fruit flavor. Do it. You’ll thank Rose Levy Berenbaum for it later.

When you’re ready to fill the pie, sprinkle on four teaspoons of corn starch and a half teaspoon of almond extract (trust me, it’s a great addition), and stir until you can’t seen the corn starch anymore. Then, pour it into the shell.

Next, cut out your top crust. I use a pie crust shield as a template. Like so:

Moisten your index finger and wet the edge of the bottom crust (this will act like an adhesive, sealing the two crusts together). The just flop on the top crust:

Here you have two options. You can jump straight in to crimping, or you can tuck the excess top crust down under the edge of the bottom crust first. The first method is easier (maybe better for a first-timer), the second yields a more attractive border. Either way, give the crust a good, firm squeeze to seal it:

I like a good ol’ rustic fork crimping, but do whatever you wish.

Cut a few steam vents in the top and you’re done.

Put the pie in the fridge for another hour. Yes, I said another hour, superior pie takes time! This will further relax any gluten and keep the pie from shrinking up in the oven. Set your hot box to 425 and put a pizza stone directly on the floor of the oven.

Once the oven is heated and the pie relaxed, put on your pie crust shield (if you like) and set the pie down right on the stone. The idea here is to quickly cook the bottom crust so it won’t absorb any excess moisture. Bake it for 30 minutes, then move the pie to a lower rack for a further 10-20 minutes to finish the bake. The pie is done when the crust is golden and you can see thick bubbles of filling bubbling up through the steam vents.

Filed under:  Basic Fruit Pies, Pastry, Pie | 8 Comments