
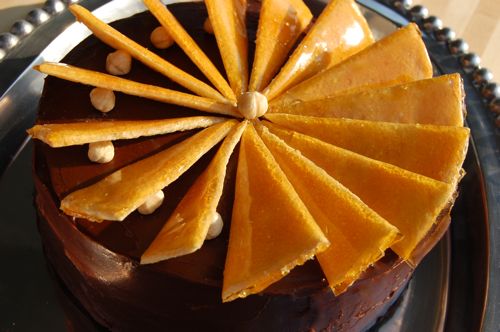
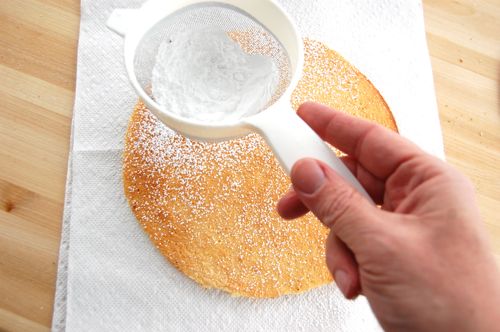
Ooh…ahh…are the kinds of noises people make when this torte arrives at the table. It’s a show-stopper of a presentation, particularly good for people like myself who are terrible at piping. And while those caramel-topped “fan blades” may look difficult to produce, they really aren’t provided you have an offset icing spatula, a chef’s knife and a little buttered parchment paper. But we’ll get to that.
Start with the icing. It’s a simple melt-and-stir affair, though I’ll warn you that in true old-school Hungarian style it contains raw egg yolks. Given how intensely sweet the layers are, and that microbes aren’t known for their ability to grow in sweet and fatty icings, I’d say the odds of cultivating a food borne hazard are remote. However I’m not a food safety scientist, so use your best judgement. If you live in North America you might want to seek out some pasteurized yolks, or just use ganache to frost the torte instead. Put the chocolate into a bowl and zap on high in the microwave for ten seconds. Stir and zap again for another 10.

Continue on in this way until the chips are almost completely melted. Use the residual heat to melt the chocolate the rest of the way. The chocolate should be close to room temperature when you’re finished. Set it aside and allow it to cool while you prepare the rest of your ingredients.

Put the soft butter in the bowl of a mixer fitted with the paddle (beater). You can do this by hand if you wish.

Beat the butter for about a minute until it’s quite soft, then add the yolks and the vanilla.

Beat until incorporated, then add the powdered sugar and the melted chocolate.

Beat until the mixture is uniform and fluffy, scraping once or twice.

Apply a small dab to a cake circle or a platter.

Lay on your first layer (pressing down lightly so it sticks).

Then carry on applying very thin applications of frosting (mere scrapings if you have ten or more layers)…

…until you’ve used all but one of your layers.

Spread the rest of the chocolate mixture over the cake.

Don’t forget those sides…it need not be perfect since everyone’s going to be looking at the top!

Speaking of which…lay your thinnest layer on a piece of parchment paper, and apply a little melted butter around the edge with your finger (butter under the layer’s edge as well).

Swirl the sugar and water in the a small saucepan over high heat until it turns amber (for more on making caramel, see this post on making caramel and caramel sauce.) Pour the caramel over the layer and quicky — but carefully — spread it over the layer. If you make a mess, don’t worry about it, just be careful not to touch that caramel with your bare hands because it’s really, really hot.
Here I should point out that the caramel pictured just below is too dark. I’d already made the caramel top pictured above when I took these photos, and was experimenting with a bit more cooking. The problem is that while a darker caramel has a richer taste, it turns out rather gooey due to all the molecular flotsam and jetsam it contains. So when it comes time for the cutting the caramels sticks, even to a buttered knife. So cook your caramel, yes, but only to a medium amber.

Once the caramel is spread, count to ten (to allow the caramel to harden a little), pick up your chef’s knife and begin to cut it. Cut the top in half, then crosswise into quarters, crosswise into eighths, and finally sixteenths. As the wedges cool, continue to apply the knife or a pizza cutter along the scores, making sure the pieces separate.

To finish, apply a hazelnut to the top about an inch and a half from the edge.

Lean one of the wedges onto it at about a 30-degree angle.

Continue on all the way around until you’ve used all — or virtually all — of the pieces. I find I usually use fifteen instead of sixteen, as I like the snack. Also, the top looks crowded to me when I use every last piece.

Call me crazy, it’s my own little idiosyncrasy (of which I have many). Serve this torte chilled.


