
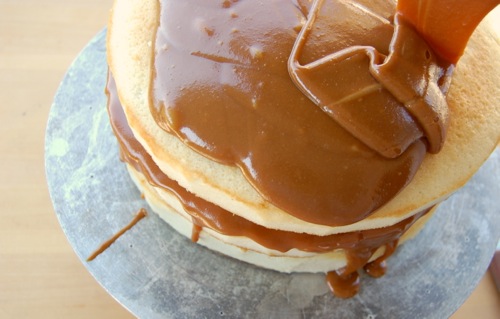
Many a little old lady has trodden caramel cake territory. Go there and you’ll find yourself getting in touch with your inner granny, the one with the heavy orthotic shoes, lace collar and tinge of blue in her hair. I did and I can tell you that it made me a better baker. However later I found myself complaining about street crime, the rudeness of pharmacy clerks and the scandal of mini skirts. It was a double-edged sword.
This is a sweet, rich layer cake that demands some time, though not more than any loving octogenarian would be willing to devote. So no excuses, K? Start by preparing three layer pans for baking. If you don’t have a third good one, a springform pan will fill in well here. Next, preheat your oven to 350 degrees Fahrenheit. That done, sift your cake flour into the bowl of a stand mixer.

Add in the sugar, salt and leavening.

Stir it all together on low, then add the soft butter. Stir on medium-low until it’s incorporated.

Next add 3/4 cup milk and beat on medium high for about 90 seconds.

Scrape the bowl well.

Combine the remaining milk with four of the egg whites and the vanilla and whisk it all together with a fork.

Pour in about a third. Beat the batter for about 10 seconds on medium high.

Scrape…add another third, beat, scrape, you get the idea.

When the batter is homogenous scrape it into a large bowl.

Wash out the mixer bowl and add the egg whites. Don’t go crazy with the washing and such. The idea that even the tiniest speck of fat will ruin an egg foam is a myth. A hot rinse and a wipe-out are fine.

Whip the egg whites to soft peaks.

Fold them into the batter and you’re ready to roll.

Scrape an equal amount of batter into the three pans. For those who are weighing, it’ll be about 21 ounces per.

Bake them about 30 minutes until they’re lightly browned and springy to the touch. Let them cool about 20 minutes…

…then invert them onto a wire rack to cool completely, about another half hour. If I were going to do this a second time I’d put a sheet of parchment down since the top crust is a little sticky. The three layers can be frozen at this point for up to a couple of months. I generally like freezing layers for at least a short while since it makes it easier to trim and top them, a step I also recommend.

When you’re ready to assemble the cake, prepare your icing. Put one layer down on a cardboard round or cake circle and pour on about a cup and a half of icing. Spread it around a little, stack on the third layer and repeat.

When all the layers are on, pour most of the rest of the thickened icing over the top (you’ll have extra). Had I been thinking clearly at this step I would have transferred it to a wire rack sitting a sheet pan, instead of just leaving it on my cake wheel here. Unfortunately I had a kindergartener and a third grader behind me just then, and they were arguing. I was too busy threatening them with a loss of Bugs Bunny privileges, and it got messy.

Promptly cover any bare patches before the icing firms too much.

Allow the icing to firm at least half an hour (more is better) before slicing and serving. This is good stuff. Had parental discipline not prevented me last evening, I would have cut and photographed the cake right away while the icing laters were perfectly distinct. However I waited until this morning, at which point I saw that the icing had soaked into the cake a bit. It’s not a big deal, but it looked perfect last evening and as an uptight sorta guy, I prefer perfect when I can get it.

C’est la vie, eh? But it tasted just like it would have had my grandma ever made it. But she didn’t. Oh, the wasted years.