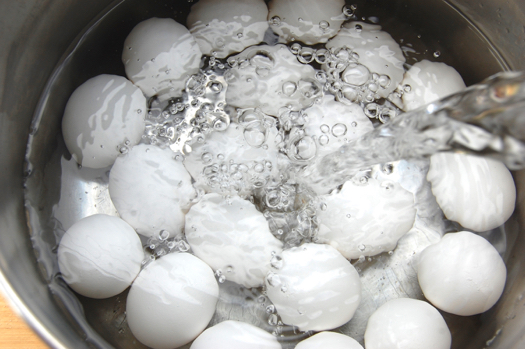
Category Archives: Pastry Components

Making Colonnade Frosting

The amazing thing about this frosting is that while it looks like a standard seven-minute frosting it behaves much, much differently. Whereas seven-minute frosting hardens to a stiff meringue-like consistency almost immediately after it’s made and applied, this stays smooth and spreadable — even after several days in the refrigerator. That makes it somewhat dangerous since leftover frosting is wicked good on a vanilla wafer, or two, or three…

On a cake colonnade frosting sets up after about twenty minutes, and while it may form a thin crust, underneath it remains soft. As for why this frosting is named for a row of columns in a classical Greek structure, I can’t say. Start by assembling your ingredients. Combine the sugar, corn (or glucose) syrup in a small saucepan and bring it up to 238 degrees Fahrenheit (soft ball stage).

Meanwhile, put the whites in the bowl of a mixer fitted with the whip.

Whip to stiff peaks. I nearly overdid it here. These are maybe a little too stiff for comfort…they’re nearly dry, and dry is not what you want.

When the syrup is up to temperature quickly transfer it to a glass measure or some other convenient pouring device. With the machine off, pour about an ounce of the syrup in. Turn the machine on high for ten seconds. Turn it off, add another ounce of syrup, turn it to high for 10 seconds, you get the idea. The frosting will increase in volume and silkiness.

Lastly whip in the powdered sugar (and any colorings or flavoring you’d like). The powdered sugar adds body and, I believe, the small amount of corn starch works as a dessicant to keep the frosting from weeping.

Use right away or store in the refrigerator for later.

Filed under:  Colonnade Frosting, Pastry | 2 Comments

Colonnade Frosting

This was my grandmother’s secret weapon frosting. It’s very similar to a seven-minute frosting save for the fact that it doesn’t harden. It stays supple under a thin crust. It’s a great combo with her gold cake. How could I resist posting this? This recipe makes enough for one two-layer cake.

16 ounces (2 1/4 cups) sugar
4 ounces (1/2 cup) water
2.12 ounces (3 tablespoons) corn or glucose syrup
3 egg whites
0.6 ounces (1/3 cup) powdered sugar

Combine the sugar, water and corn syrup in a small saucepan. Cook to the soft ball stage (238 degrees Fahrenheit on a thermometer). Meanwhile whip the whites to stiff peaks. When the syrup is ready, pour some into the mixer, whip for about 10 seconds. Turn off the mixer, add more, whip for another ten seconds and so on until the all the syrup is incorporated. Lastly whip in the powdered sugar. This frosting can be customized with a variety of flavor extracts.

Filed under:  Colonnade Frosting | 12 Comments

Chocolate “Sauce” Recipe

I’m putting sauce in quotes because a chocolate syrup is really what this is. However since I love David Lebovitz’s idea of bolstering regular chocolate syrup with a little eating chocolate to give it extra body, I’ll add some to my go-to syrup recipe and call it sauce! Thanks David! Cut the sugar down by as much as half for a less-sweet version.

2.25 ounces (2/3 cup) cocoa powder
7 ounces (1 cup) granulated sugar
8 ounces (1 cup) water
1/4 teaspoon salt
2 ounces bittersweet chocolate, chopped
1 teaspoon vanilla extract

In a medium saucepan, whisk together the cocoa powder, sugar, water and salt. Whisk it over medium heat until it comes to a boil. Boil it for four minutes, whisking all the while, then remove the pan from the heat. Let the mixture cool about two minutes, then stir in the chocolate and vanilla. Allow it to sit several hours to thicken before you use it. Store it in an airtight container in the refrigerator for up to a month.

Note: if you’re cutting the sugar, try simmering for about another two minutes to reduce it a bit more. You can also add another 1/4 teaspoon salt or more if you want to do the hip “salted chocolate” flavor thing!

Filed under:  Chocolate Sauce, Pastry | 24 Comments

Chocolate Chantilly Cream

Think of chocolate Chantilly cream as a really thin ganache — whipped. Yes, you can make chocolate Chantilly cream with cocoa instead, however the cocoa butter in the chocolate makes a nice stabilizer, helping the whipped cream hold its shape. If you wish to supplement the real chocolate with more cocoa powder to boost the chocolate flavor, you can.

Begin by combining a cup of heavy cream with about two ounces of chocolate. These are 70% chips, but just about any chocolate will do.

Zap the mixture in the microwave for about 30 seconds on high and stir, then use as many more zaps of 15 seconds as you need to melt the chocolate completely (stir between each). The mixture will start out looking grainy…

…then smooth out as you re-establish your emulsion. Be advised, the darker the chocolate the more you’ll need to blend the mixture to avoid flecks. I got some as you can see above, but they were small enough that I really didn’t mind them. Use a stick blender to get a perfectly smooth emulsion. Refrigerate the mixture for about 4 hours until it’s quite chilly.

Pour the whole thing into the bowl a mixer fitted with a whip.

And whip to soft or stiff peaks, whichever you prefer. If you want to sweeten the cream along the way, you can do that as well.

Filed under:  Chantilly Cream (Chocolate), Chocolate Chantilly Cream | 24 Comments

Making Diplomat Cream

Diplomat cream is what you use when you want the flavor of pastry cream but in a lighter, fluffier package. It makes an outstanding filling for all sorts of things that aren’t baked afterward (or are only finished in the oven or broiler, like brioche polonaise). The whipped cream it contains can’t take heat.

I know what you’re thinking: just how much whipped cream is in this, Joe? Well that’s up to you. Diplomat cream can be as light as 1-1 pastry cream to whipped cream. My ideal is 2-1 pastry cream to whipped cream. But you can go heavier or lighter as you see fit. I generally go with a less-sweet pastry cream and a slightly sweetened whipped cream, so the overall effect isn’t too sweet. If both components are just barely sweet enough, the finished product will be about perfect. Put the two in a bowl:

Fold gently together.

And bingo, you’re done! Use it right away.

Filed under:  Diplomat Cream, Diplomat Cream, Pastry | 2 Comments

Making Red Velvet Cake

There’s only one absolutely critical thing you need to remember when making red velvet cake: wear an old shirt. Other than that it’s much like making a basic yellow butter cake. The odd alchemical steps you find in many traditional recipes really aren’t necessary. Plenty of food coloring and a little cocoa is the extent of the juju.

Which is not to say that red velvet cake is indiscernible from yellow cake in the mouth. The quarter cup of cocoa does create a distinctive taste and texture, and the food coloring itself brings a few unique hints of flavor to the party. Begin by preheating your oven to 350 degrees Fahrenheit, assembling your ingredients and preparing two 9″ cake layer pans. Combine the dry ingredients in the bowl of a mixer fitted with a paddle (beater). Stir it all on low for about 30 seconds.

Add the soft butter and stir on medium speed for about a minute.

Add one cup plus two tablespoons of the room-temperature buttermilk, and raise the speed to medium-high. Beat the batter for 90 seconds.

Next combine the yolks and the food coloring. I grant you, this looks a little disgusting.

Add 1/4 cup of the buttermilk and stir it all together.

Add it by thirds to the batter, beating in each addition for 20 seconds.

Be sure to do plenty of scraping.

Then scrape the batter into the prepared pans. About 21 ounces of batter per layer.

Bake until they’re firm in the center, 25-30 minutes.

Cool the layers on a rack for ten minutes, then turn them out to cool completely before using. Red velvet layers can be combined with any number of frostings. Here I’m using a standard seven-minute frosting, but “heritage” a.k.a. “boiled” a.k.a. “flour” a.k.a. “cooked flour” a.k.a. “gravy” a.k.a. “cloudburst” frosting is popular, as is cream cheese. Just so long as it’s white!

Filed under:  Pastry, Red Velvet Cake | 50 Comments

Making Seven Minute Frosting

Seven minute frosting’s main virtue is that it’s fast to make and gives you, for ten minutes of effort, a silky and luxurious frosting that’s light and fluffy and sweet rather than rich (for those who can’t deal with the heaviness of a buttercream). You whip it up while your guests are finishing their meal, throw your cake together and serve it. Sure it’ll hold for longer than that, but not terribly much longer. The frosting begins to firm and crystallize as soon as it cools. It gets slightly gummy after an hour, has a crust on it after two hours, and is often hard as baked meringue a day later. So it’s an ephemeral treat, but well worth doing for a truly homespun layer cake experience.

Careful readers will note uncooked egg white in this recipe. If that bothers you, pasteurized egg whites are available in most supermarkets in the States. There’s so much sugar in this recipe that it seems (at least to me) impossible that any microbes could grow in it. But act according to your own preferences. Set a pan (or the lower half of a double boiler) with about two inches of water on the boil. Place all your ingredients save for the vanilla into a metal bowl (or the top of a double boiler). Have a hand mixer at the ready.

Beat everything on medium-high for about a minute to combine.

When the water is boiling, put the pan over the water, making sure no water is touching the bottom of the pan.

Whip for seven minutes until it looks like this:

Beat in the vanilla or any other flavoring you’d like to use. A chocolate version can be made by folding in about three ounces of melted dark chocolate. It will incorporate readily into the warm foam. Use the frosting right away as it will start firming as soon as it cools.

Filed under:  Pastry, Seven Minute Frosting | 14 Comments

Seven Minute Frosting Recipe

They call it “seven minute” frosting because that’s how long you’re supposed to beat it with a hand mixer over boiling water. It’s amazing how right on that figure is. Seven minutes does it every time. Assemble:

10 ounces (1 1/2 cups) sugar
1/4 teaspoon cream of tartar
1/8 teaspoon salt
2.65 ounces (1/3 cup) water
2 ounces (2) egg whites
1 teaspoon vanilla extract

Place all the ingredients save the vanilla in a metal bowl or in the top portion of a double boiler. Meanwhile, set the bottom portion on the heat. Beat all the ingredients on medium high for one minute. Place the mixture over the boiling water (making sure there’s no water touching the pan) and again apply the hand mixer on medium high. Beat for seven minutes until the frosting is light and fluffy, then beat in the vanilla.

Filed under:  Pastry, Seven Minute Frosting | 21 Comments

Red Velvet Cake Recipe

This should work…at least in theory, so maybe let me try this before you do. A lot of creative balderdash surrounds the red velvet cake, from its origin myths to its chemistry to its odd little preparation rituals (making a paste of red food coloring and cocoa powder, etc.). There’ll be more on all that this week. For now all you need to know is that red velvet cake is nothing more than a buttermilk layer cake with a hint of chocolate and a whole lot of red food coloring. It goes like this:

6 large egg yolks
11 ounces (1 1/4 cups plus two tablespoons buttermilk)
2 teaspoons vanilla
2 ounces red food coloring
13 1/2 ounces (3 cups) cake flour, sifted
10 1/2 ounces (1 1/2 cups) sugar
1/4 cup cocoa powder
3/4 teaspoons baking powder
3/4 teaspoons baking soda
3/4 teaspoon salt
12 tablespoons unsalted butter, softened

Begin by preheating your oven to 350˚F. Combine the yolks, vanilla, 1/4 cup of the buttermilk and the red food coloring and beat lightly to blend. Pour the sugar into the bowl of a stand mixer, then sift the flour and the leavening together into the bowl. Add the cocoa powder and the salt. Turn the mixer on low and blend the dry ingredients for about one minute. Add the soft butter and the remaining nine ounces of buttermilk. Slowly raise the mixer speed to medium and beat for 1 1/2 minutes until the batter is smooth and uniform. Scrape down the bowl.

Now begin to add the yolk mixture. Pour in about 1/3 of it, beat the mixture at medium speed for 20 seconds, then thoroughly scrape the bowl, paying particular attention to the bottom by the dimple. Continue on in that fashion until the entire yolk mixture has been incorporated. Divide the mixture between the two pans. Bake for 25 minutes, then check the layers. If the middle seems slightly sunken and mushy to the touch, continue to bake for another 7-10 minutes.

When fully baked, place the layers, in the pan, on a wire rack to cool. After 15 minutes, turn them out onto the rack to cool completely, about another hour.

Filed under:  Pastry, Red Velvet Cake | 20 Comments

Making Chocolate Filling

Bake-in chocolate fillings are strange animals because no matter what you do the chocolate is going to seize and go grainy, at least to some extent. Bar chocolate, chocolate sticks, ganache, chocolate chips, chocolate pastry cream…none of them will be the same after all that high oven heat. Which means a bake-in chocolate filling will never be creamy. Assuming you can accept that, and I have a feeling you can, proceed.

You’ll want to use a dark chocolate since that will bring the most chocolate flavor to the party. Start by chopping it as finely as you reasonably can. There’s nothing wrong with a few larger chunks in there.

Next combine the sugar and cinnamon. Why the sugar when chocolate is so delicious by itself? Because fillings are like sauces, they’re meant to add flavor to something larger than themselves. Thus their flavor profile often needs to be exaggerated. But on we go…

Add the butter and stir.

Then pour in the chopped chocolate. Stir thoroughly and it’s ready to use.

Filed under:  Chocolate Filling, Pastry | 7 Comments