Making a Fraisier
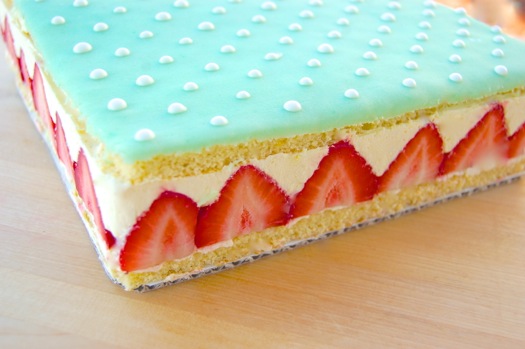
There’s nothing like a fraisier for drama. It’s got shape, it’s color, it’s got motion…and all that before you even take a bite. A fraisier isn’t a cake, it’s a gâteau, which is not a fancy French term for the same thing. Rather the word denotes a structure made up of various fruit and/or cream layers, all supported by thin layers of sponge. The fraisier gets its name from the French word for strawberry, and you can see why. This thing is packed with fruit, all held in place by an extremely rich crème mousseline filling and topped with cognac-infused sponge cake and marzipan. It ain’t messin’ around.
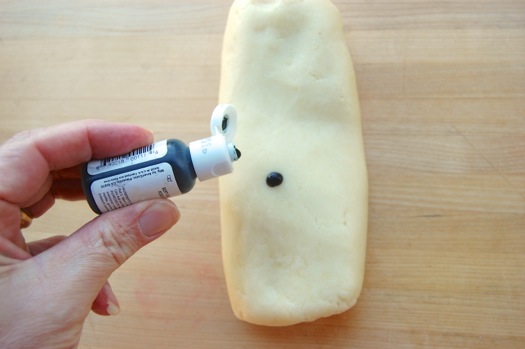
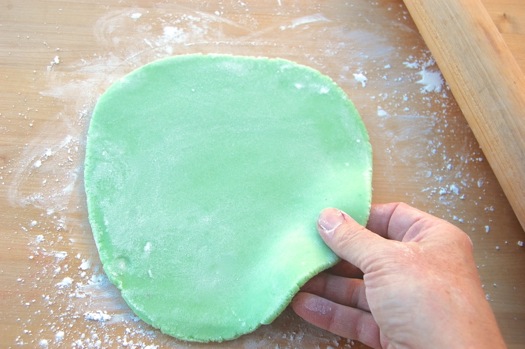
Start by getting all your components ready. As with all fancy pastries, it’s best to make up all the elements over the previous couple of days so you can devote the final day to building it. It’s a low-stress approach that’s also the most fun. So, assuming you have your génoise, crème mousseline, cake syrup, royal icing, and strawberries in hand, begin by coloring your marzipan. You want a nice mint green or rosy pink. Whichever color you choose, go easy on the food color. One drop of gel green will do this whole batch of marzipan.
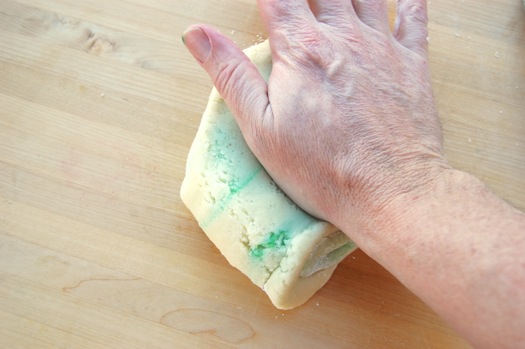
Fold it over and just knead it in. You’ll see a few streaks…
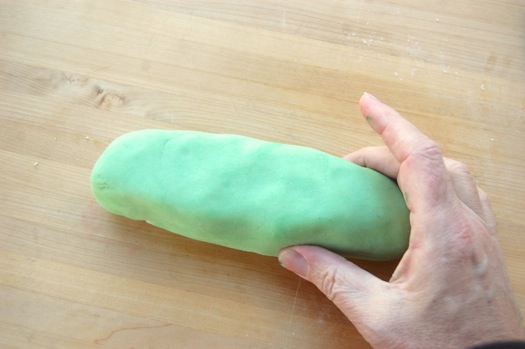
…and in about a minute the whole thing will even out. Nice!
Pan-wise I’ll be using this 8″ x 8″ x 2″ push-up pan. You can also use a 9″ round pan with a removable bottom, like a springform. Bottomless cake rounds or squares also work great if you can find them.
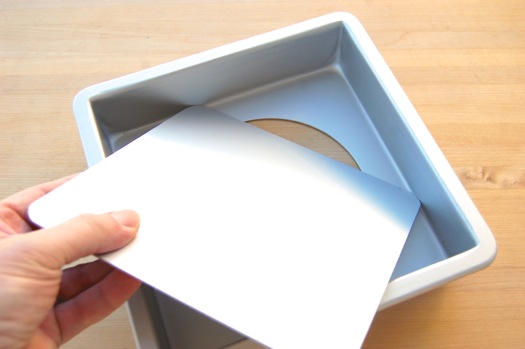
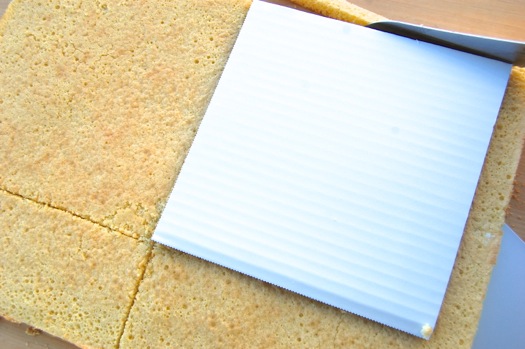
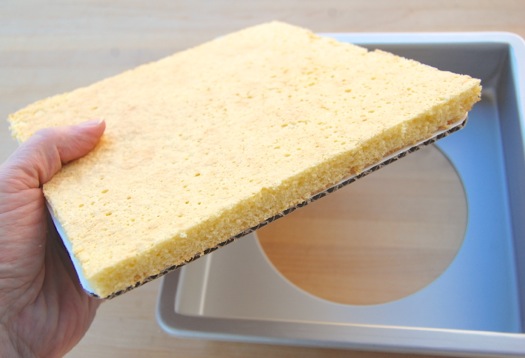
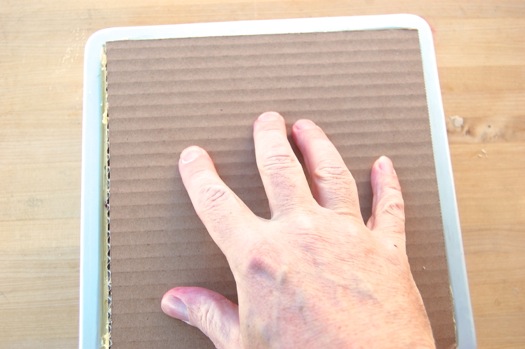
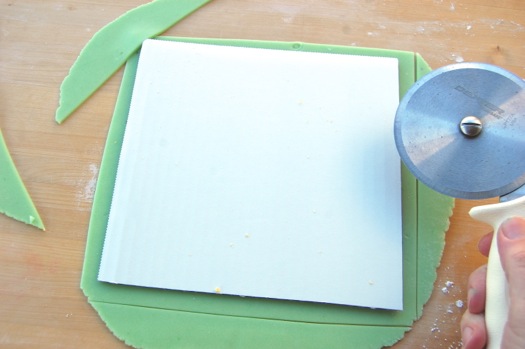
Begin by cutting the génoise. Here I have an 8″ x 8″ cardboard square that I’m using for my guide. I cut one piece of sponge out of my sheet…
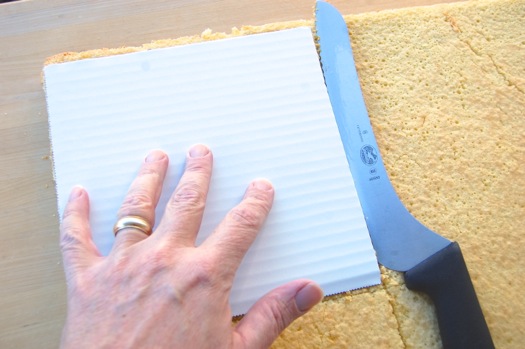
…then the other. Save those pieces to make a few petits fours or something later. You never know when they might come in handy.
Since I’ll be sending this pastry off to the university for disposal by grad students, I’m going to use my cardboard guide instead of the pan’s metal plate for the bottom.
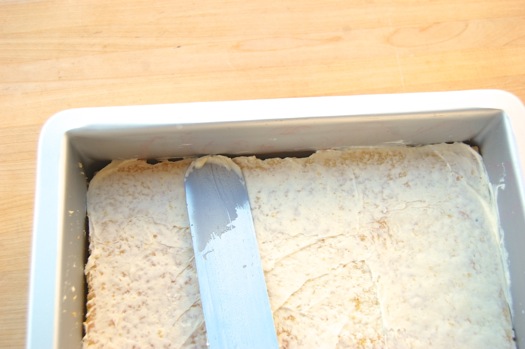
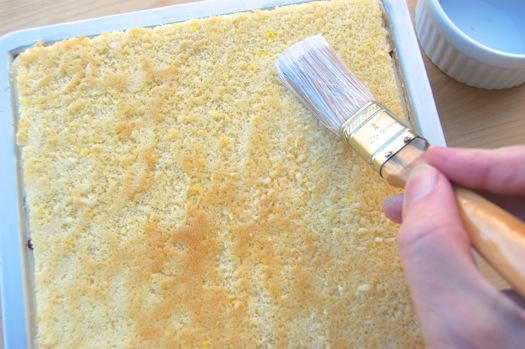
I’ll put that in the pan and cover it with a very thin layer of mousseline. This will prevent strawberry juice from weeping into the sponge cake and discoloring it. Make sure to wipe any mousseline off the sides of the pan before you start putting the strawberries on, since you’ll see all that when you unmold the fraisier. Try to wipe away any large blobs along the edges the cake as well. It’ll look neater in the end.
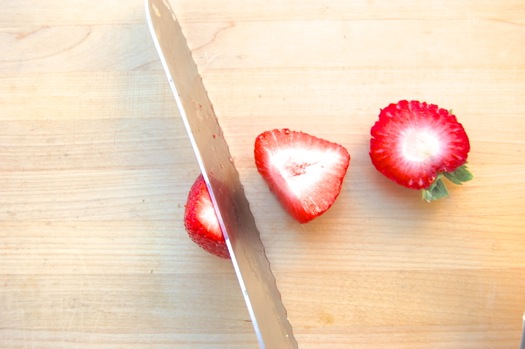
And now for the fruit. Cut the tops off your strawberries.
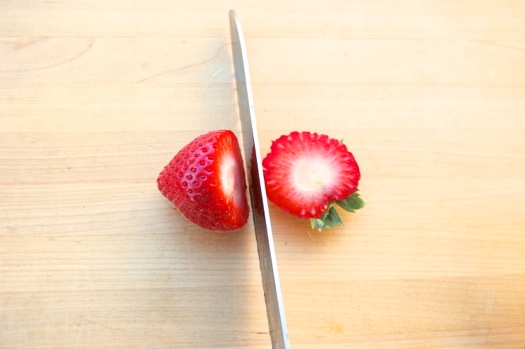
Then cut them in half, top to bottom.
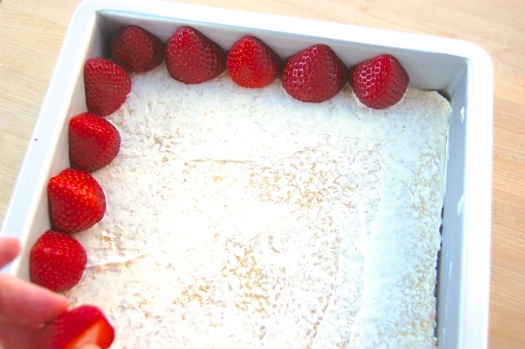
Apply them cut-side out to the sides of the pan.
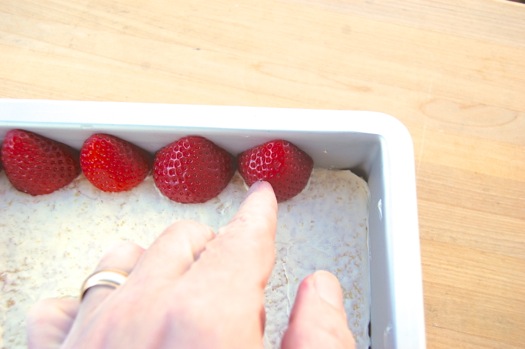
Go all the way around, fitting them as best you can. Oop, there’s a little mousseline there. Better wipe that!
Now put in about a cup of mousseline, enough to come about half way up the strawberries.
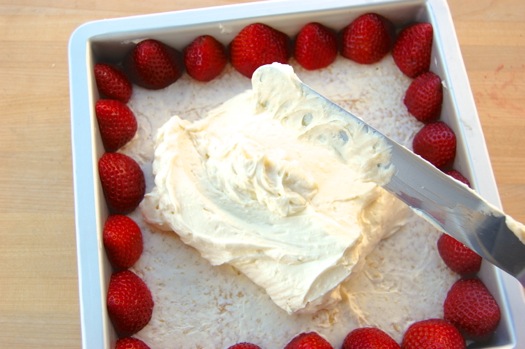
Gently push the mousseline against the berries to get it into the spaces between the berries.
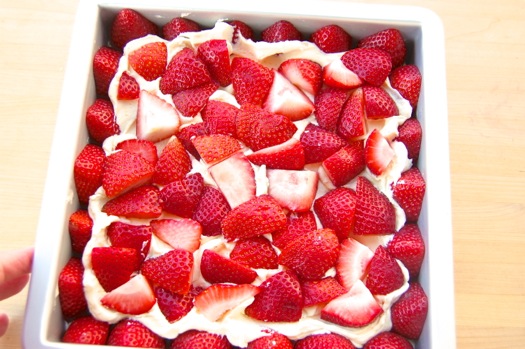
Now add the rest of your berries, all cut into pieces.
And then another cup or so of mousseline, enough to cover the strawberries on the sides of the pan.
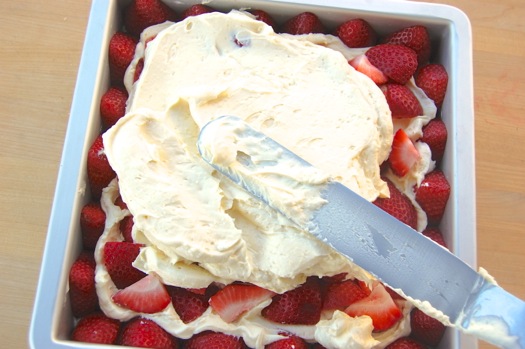
Again make sure you gently press the mousseline into the spaces between the strawberries around the edges. Go along the edge making little twisting motions with your icing spatula.
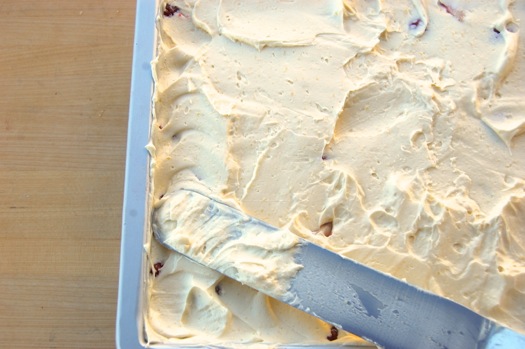
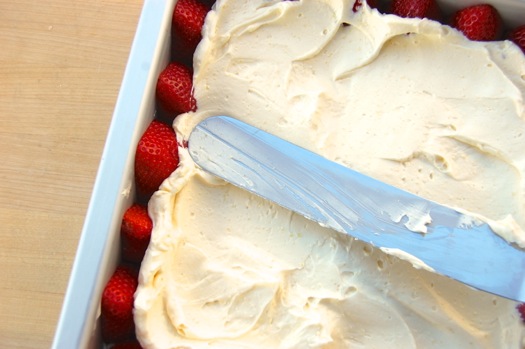
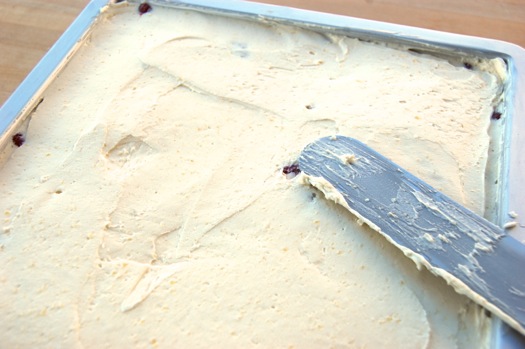
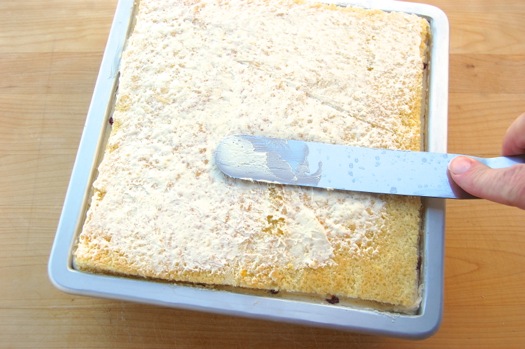
Then smooth out the top. You want to linger over this step, making sure this layer is completely flat, as the shape of this layer will dictate the contours of your top. The tendency is always to heap up filling in the middle and forget the corners — so make sure you don’t. Again, carefully wipe away excess mousseline on the pan sides.
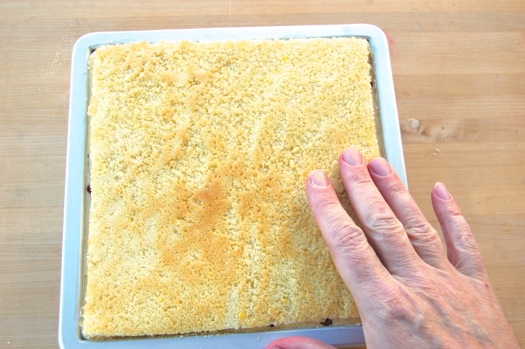
Once you’re satisfied, put the other sponge piece on top.
Apply your cardboard guide to the top (in my case I had two of these) and press down firmly to compact everything a little. Don’t get carried away here. About five seconds of gentle but firm pressure.
Now’s the time to apply a little of your cognac syrup if you’re using it. Don’t get carried away and soak it. You can also skip this step if you like.
Apply another very thin scraping of mousseline which will function as a glue to hold your marzipan top on.
Now it’s time to roll out your top. Take about half the marzipan and apply it to a board lightly dusted with powdered sugar. Dust the marzipan a bit and also your pin to prevent sticking.
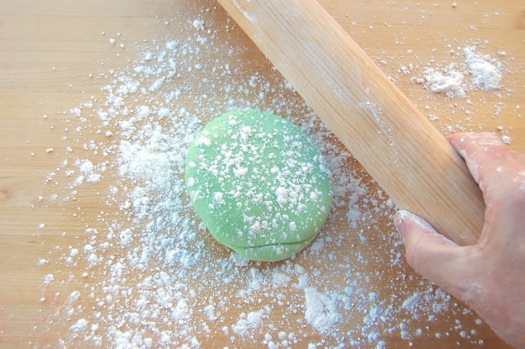
Apply the pin and roll a bit, moving and/or rotating the marzipan every so often to make sure it isn’t sticking. If it is, apply more sugar.
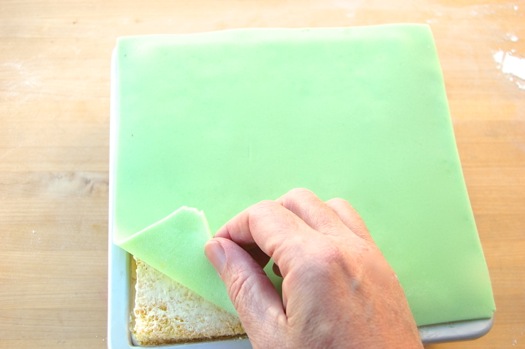
Once the marzipan is rolled out to a thickness of about 1/8″ or so, use your guide to cut a square. I leave a little extra on the edges since it gives me room for error putting it on.
Depending on how confident you’re feeling, you can pick up the marzipan and put it on, or drape it over your rolling pin if that feels better.
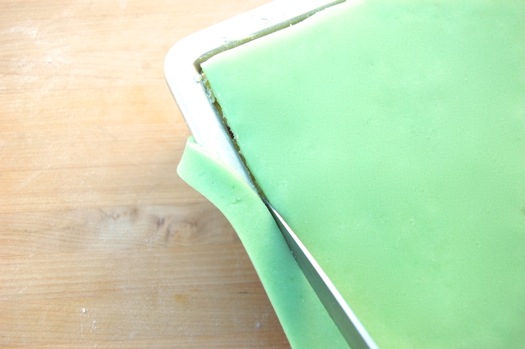
Once it’s applied, go around and trim it with a very sharp knife using little sawing strokes.
Almost there! Lastly you can do a little decorating. Since I’m a no-frills kinda guy, I generally use simple geometric patterns. I apply a ruler, then make a little dot of royal icing at the inch intervals.
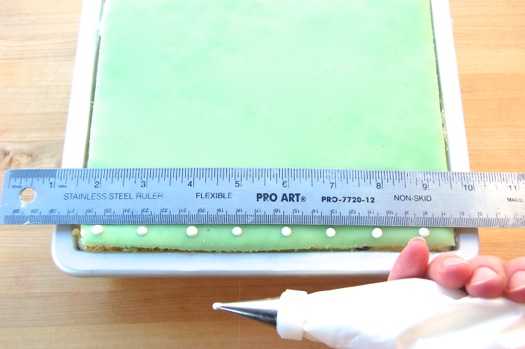
I then move the ruler back half an inch and make little dots on the half-inch marks.
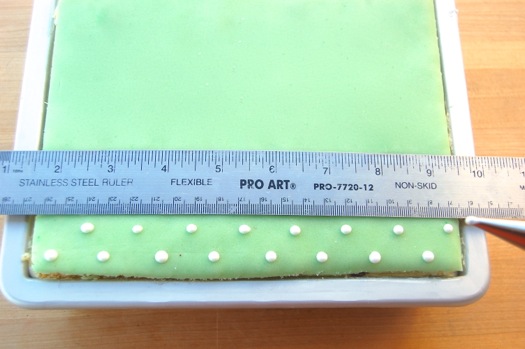
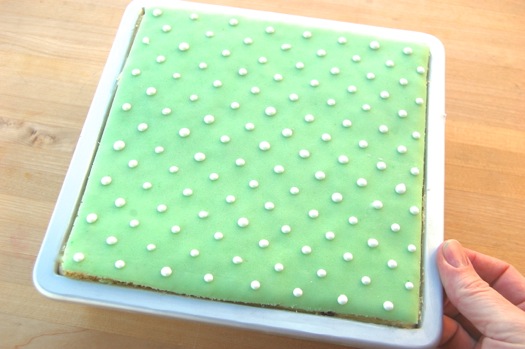
About ten minutes of that action and I have this sort of arrangement. Don’t worry if you mess up a few. You can always go back once the icing dries and remove misshapen dots. Or just leave them since once the cake is cut absolutely no one will know or care. Put the fraisier in the refrigerator at this point and chill it for about four hours or overnight.
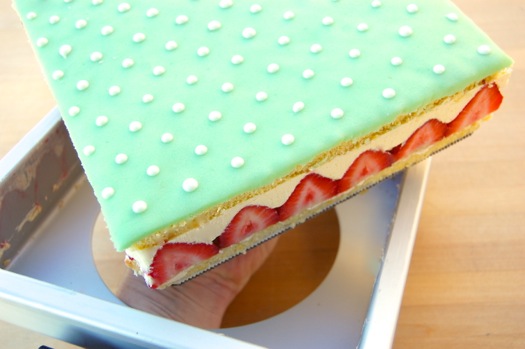
When the fraisier is fully chilled, it’s time to unmold it. You’ll want to let it sit at room temperature for about half an hour or more so the pan warms a bit and the sides loosen. Test the fraisier’s readiness by applying some pressure to the bottom. If it resists you too much, let it sit another 10 minutes or so. Eventually it will release.
There. Pretty no? Like cool flames.
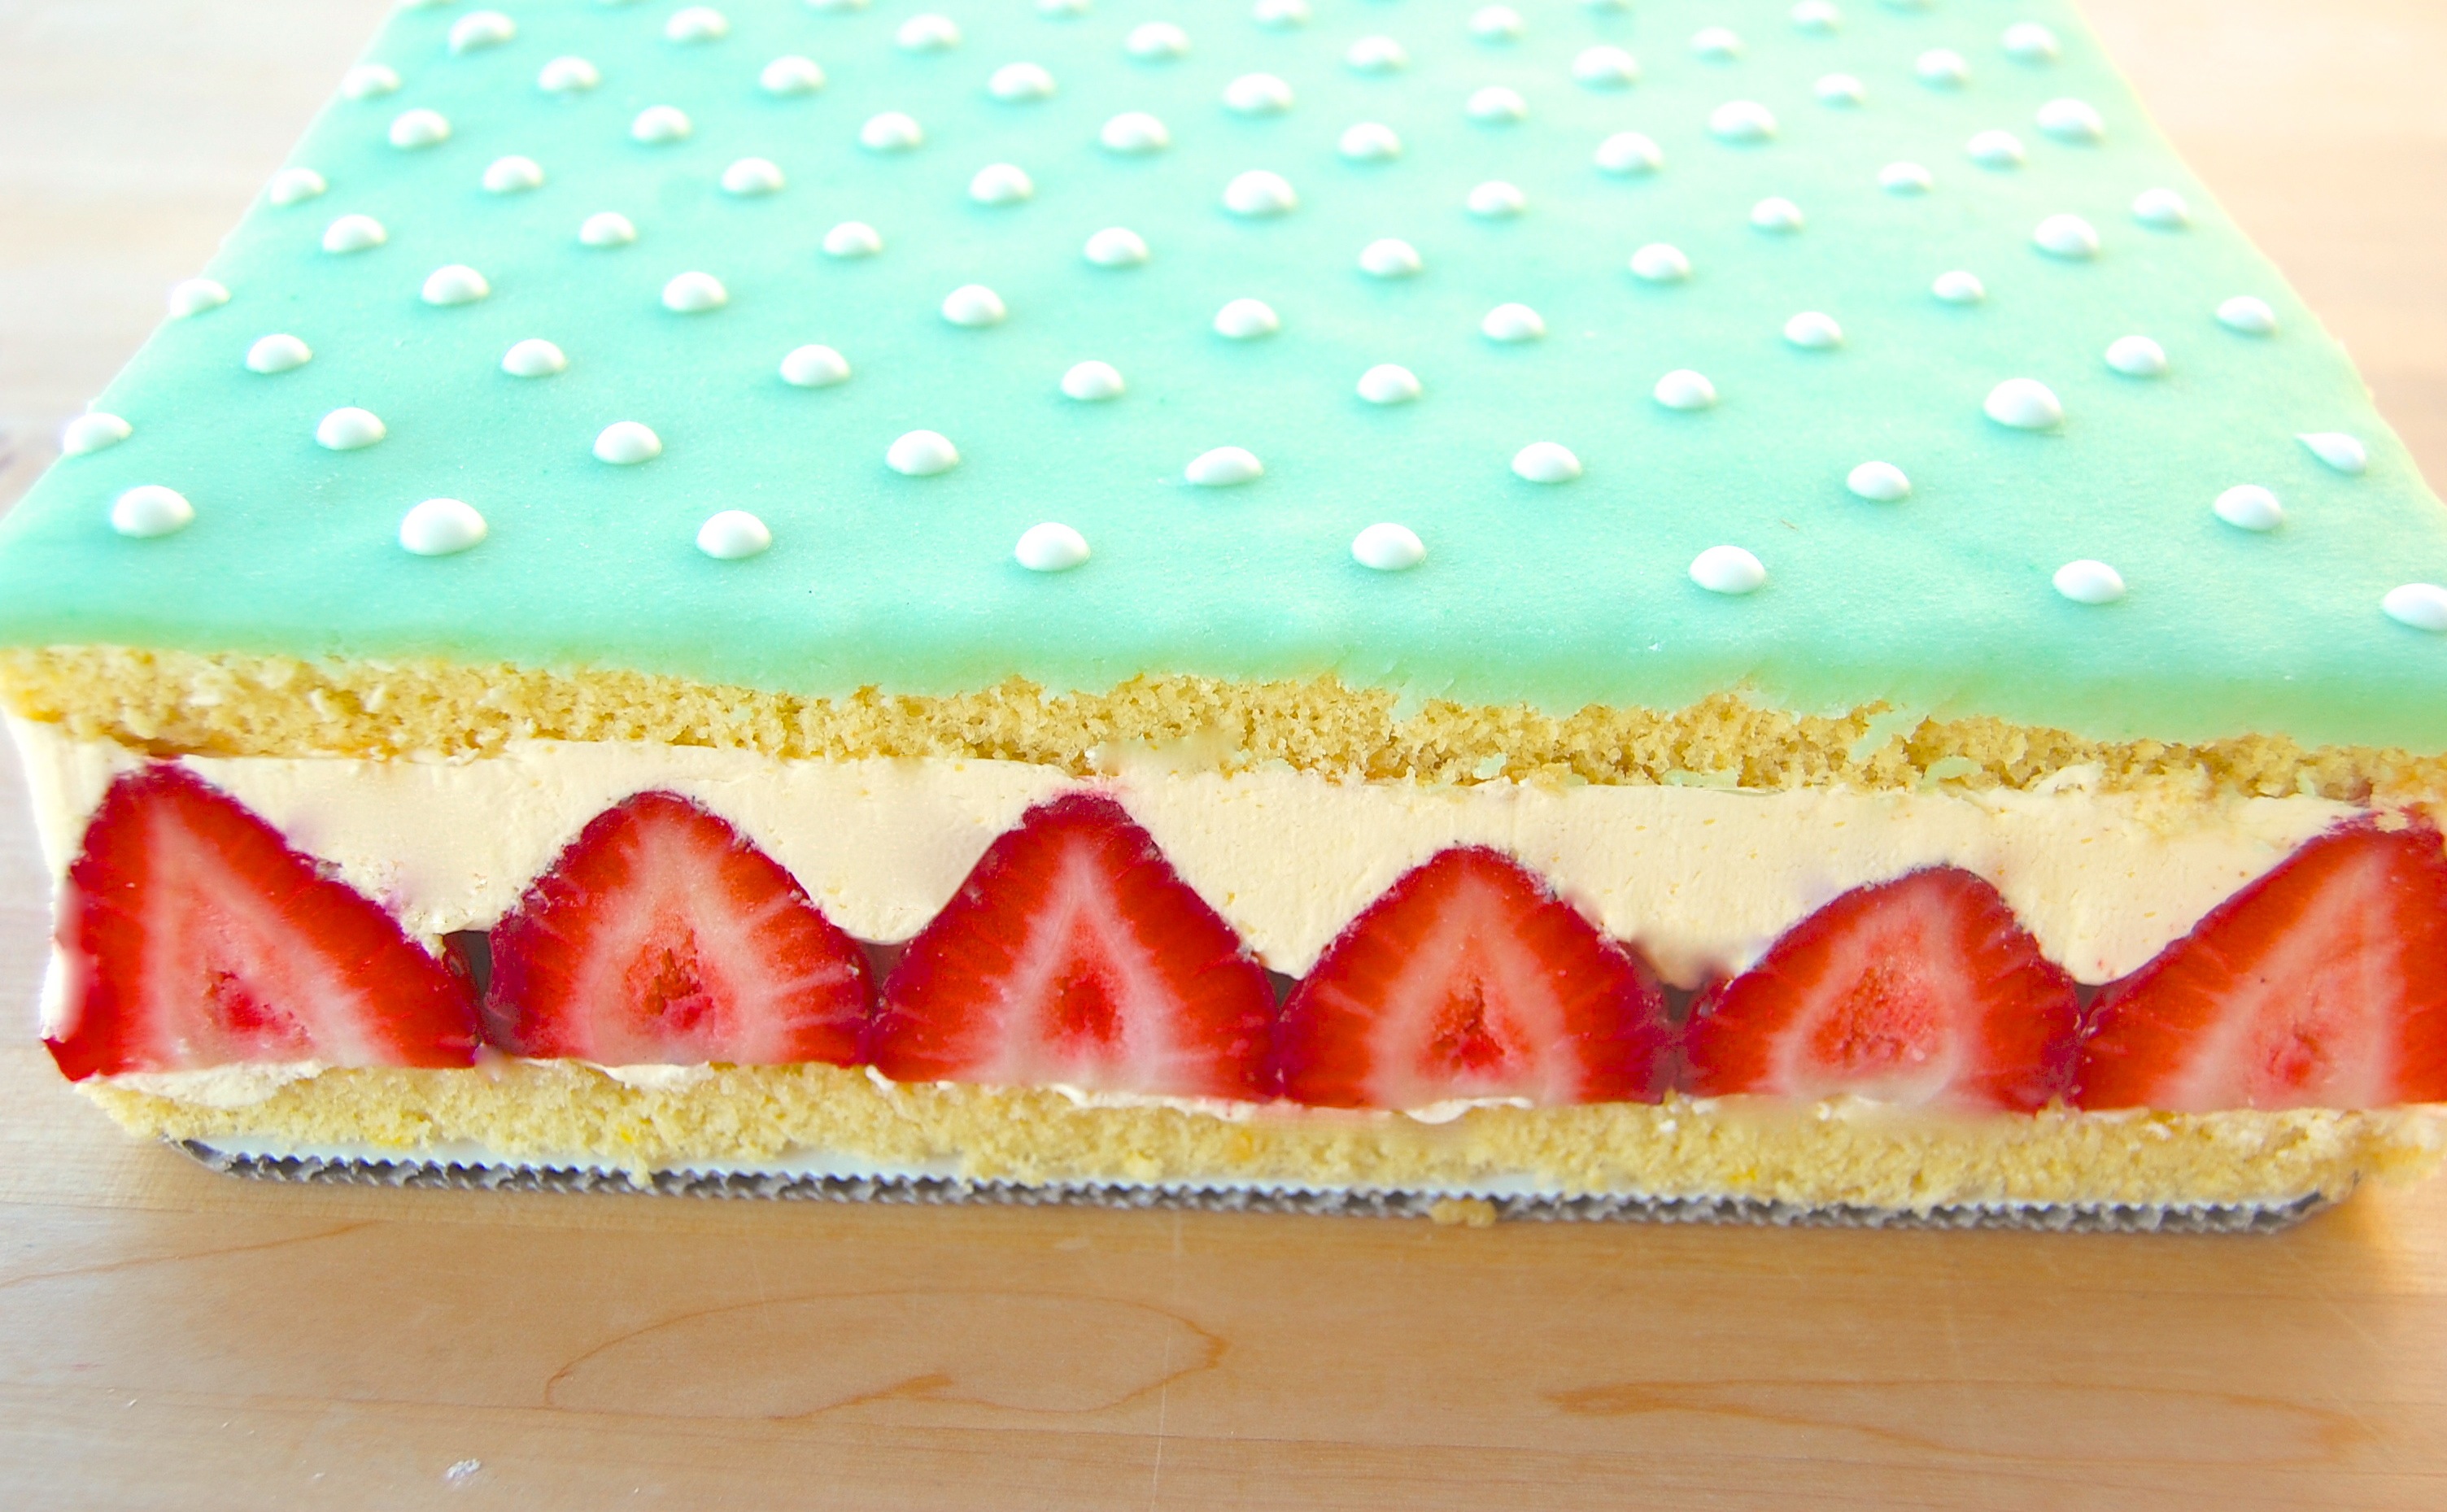
Some sides will surely be better than others. But all in all you’ll be pretty pleased.

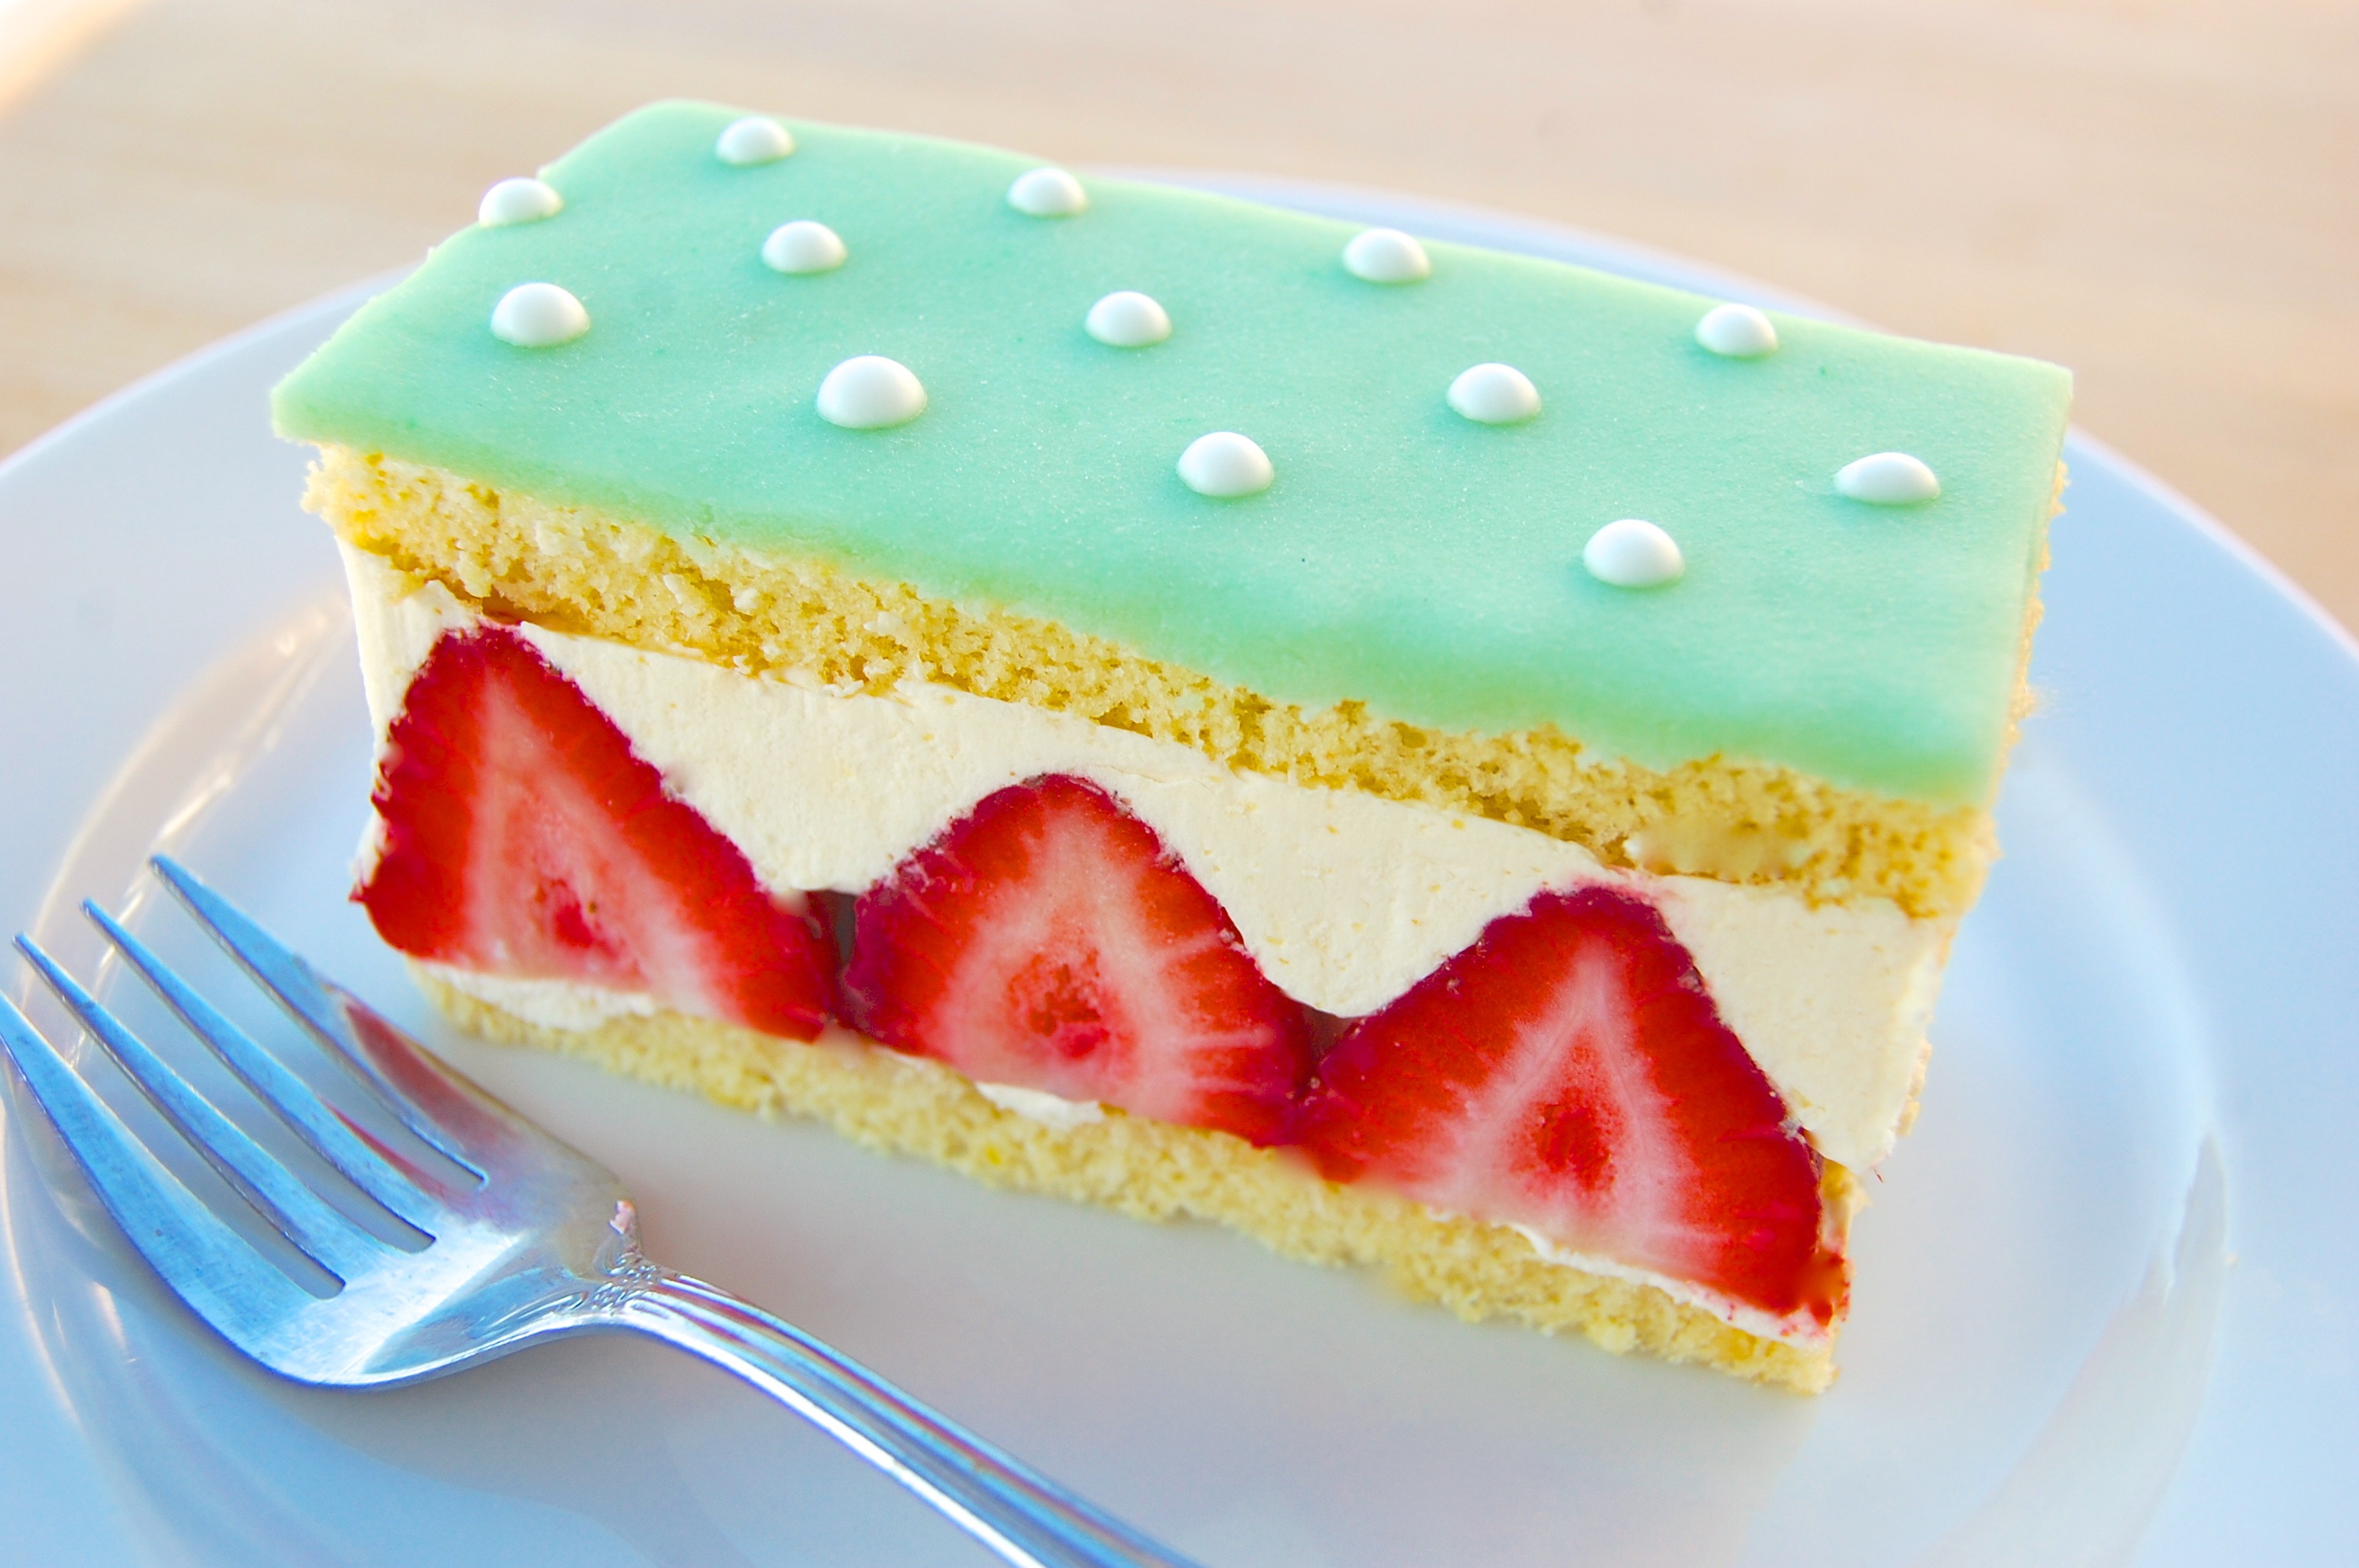
Cut the cake as you like — while it’s cold. This easily cuts into 2″ x 4″ pieces, which is a bit much for dessert, but just about right for the middle of the afternoon with a cup of coffee. Make sure you let the fraisier slices sit at room temperature for at least half an hour before serving to allow the moussleine to return to its silky texture.
Excuse me, won’t you?
Wow, that’s pretty! Not bad, Joe.
Thanks, Naomi!
– Joe
As if your Fraisier wasn’t beautiful enough, you had to go and decorate it with an axonometric pattern. I think I need to go lie down.
lol
I’ve been working with a new client that does 3D scanning, Gretchen. I must have done it because my mind is full of point clouds and vector renderings. 😉
But thanks very much! Cheers,
– Joe
OMG! That may be the prettiest food I’ve ever seen.
Ha!
Thanks, Rainey!
– Joe
That is the prettiest Frasier I’ve ever seen! The minty green top with the simple white dots and those vivid red berries just makes it so colorful. Looks like Easter to me.
You made my day, Susan! And you’re right, this is all about spring…in November. 😉
Cheers,
– Joe
What you mean to say, is there’s nothing like a “Joe Pastry” Fraisier for drama, especially with those colours. Love the contrast of the blue-green marzipan against the red of the strawberries – this has to be one of your most colourful posts in quite sometime. I take it you take some pleasure in teasing and taunting your readers with this pornography (I sure would). Had been thinking of making the chocolate charlotte from a Pierre Herme book, but maybe now it will have to wait a while…
Hehe…OB, you crack me up. I was thinking that photos don’t do justice to how beautiful this pastry really is. How’s that for food porn? 😉
Thanks and – hopefully – more soon! 😉
– Joe
Wowzer! That looks amazing Joe. Thanks for being an inspiration.
Thanks, Malini!
I had fun doing it!
Cheers,
– Joe
Grad student checking in, feel free to send some experiments to Cambridge for disposal!
Hehe…I’ll put you in the list, Evan!
– Joe
Looks amazing and the step-by-step is helpful as always. 🙂
I had fun, Mark!
Cheers,
– Joe
Simply stunning.
Thanks, Suzanne!
– Joe
Oh my, perfection!! I love this tutorial. I sometimes omit the marzipan because it tends to get hard the next day. Any tips on this (apart from maybe storing the whole cake in airtight container?) Thanks, Joe!
Very interesting comment, Claire! I know what you mean about marzipan getting a little stale on the outside. My experience is that when it’s made with corns syrup it doesn’t dry out as much. Also, maybe roll the layer a bit thicker if it’s getting brittle.
Those are my best thoughts for the moment, but a sheet of plastic wrap on top isn’t a bad idea either.
Cheers,
– Joe
Holy Moly Joe that is stunning!
Thanks, Bev!
– Joe
This is on my list of things to make this week, since strawberries are just coming in down here in New Zealand!
My fraisier is now made and chilling in the fridge. Not at all difficult to assemble–especially since I had left over crème pâtissière from another project left over and ready to turn into mousseline. The thing is now chilling in the fridge, and I’m chilling in a lounge chair waiting for dessert!
Woohoo! Good for you, James! I hope you have a well-deserved can of lager in your hand as well.
How did it turn out?
– Joe
It turned out really, really well! See for yourself: http://shuanglong.smugmug.com/Food/PYB-Food/n-cGrVg/i-fq9d2Kk/A
Suh-weet!!!
Great work, James. Thanks so much for the photo!
– Joe
By the way, what do you think about freezing these? I have enough of your not-quite-genoise left over, not to mention strawberries, to make another one…
Hey James!
Everything in them freezes well but the strawberries. My suggestion is to freeze all the components separately and then put the fraisier together at a later date. Cheers,
– Joe
Thanks; that’s what I thought, too (but my mother disagreed–would you please right me a note saying I was right?!).
Hehe…I’ll have it notarized and sent overnight. Otherwise she still might not believe you.
– Joe
The weather outside my window is very VERY unstrawberry. It’s drizzly cold dreary dank & depressing, but just looking at all this strawberry deliciousness has made it all better. You are clearly a genius. Thank you.
(Confidentially, part of what cheered me up was imagining myself eating the gâteau whole like some kind of glorious sandwich.)
Nice idea, Shelley!
And on the genius thing, is there any way I can convince you to write a note to Mrs. Pastry to that effect? For some reason she doesn’t believe it when I tell her.
Cheers,
– Joe
I have only seen one pastry ever that was as lovely as your fraisier. Should I get ambitious, in what order do you recommend making the components if paced out at one per day leading up to the grand assembly?
Very high praise, LML, I’m deeply flattered. You’d be surprised that this isn’t terribly difficult to make. I’d suggest making the génoise first and freezing the cut pieces. Make the marzipan next, then the pastry cream. Both can be kept several days. On the day you build, whip the butter into the pastry cream to make the mousseline and get down to business! Have fun!
– Joe
I can confirm that this is not at all hard to make. If you are methodical and time the thing correctly, it would not take more than an hour or so (plus chilling time) to have it ready to pop in the fridge.
Thanks for the testimony, James!
– Joe
This is soooo beautiful! I am doing my son’s desert table for his wedding and this is perfect for one of the selections. Is your pan 2″ deep or 3″?
Thanks so much for the beautiful and inspiring things you bake.
Sally Pleasant, you definitely live up to your name! Thank you very much. This pan is 2″ deep. Send pictures!
– Joe
Hi Joe!
First of all, your cake looks amazing. Thank you for explaining everything so well.
i really want to make this but the strawberries that I bought are sour. Is there anything I can do?
Hi Pri!
Sour berries are probably OK. To compensate, make a somewhat sweeter pastry cream, using the full 8 ounces of sugar plus up to two ounces more.
Have fun!
– Joe
for a future project on the same theme of fruit, pastry cream, liqueur syrup, and genoise, you might introduce americans to lenotre’s famous rosace a l’orange (stained-glace rose window with oranges).
here’s a 1977 video of lenotre preparing one himself. even if you can’t follow all the spoken french, it’s an eye-opener to watch the subtle but decisive technique of the master pastry chef who completely revolutionized french professional pastry-making in the 20th century. pierre herme trained with him and says it was lenotre who has had the strongest influence on his own work.
here he even makes his genoise entirely with by hand with a balloon wire whisk. and watch how he folds the syrup-soaked layers of genoise in half and deftly places them in the orange-lined mold. you can tell by the way he so economically but effectively uses his hands and arms that he himself was trained before the wide-spread use of all the modern electrical equipment we take for granted.
http://www.ina.fr/video/CPA77050387
it’s a wonderful cake for winter and with all that grand marnier you can’t go wrong.
Excellent idea! I shall do that soon!
– Joe
That was excellent – I really enjoyed watching that!
Hey A!
I’m going to do this cake this week. I loved the video, especially the génoise-folding part. I’m a big Lenôtre fan. I buy every book of his that I can find. Why he isn’t more widely appreciated in America is a mystery to me. I was planning to do his famous Gugelhopf this month. Maybe I’ll do them both and make it a Lenôtre festival!
Cheers and thanks again!
– Joe
Really, really beautiful. I cant wait to get started. But I wanted to check, is the other side of the slice pretty too, as well as the slices we cut from the middle?
Thanks for your inspiring work. You make everything seem effortless.
Hi Sudha!
The opposite sides are not as orderly, but they are still quite beautiful. I should have showed one. Sorry about that!
– Joe
Joe- the faisier is beautiful! So much so, I showed my daughter, as her Bday is approaching. She was taken too……but wants me to change the creme mousseline to chocolate mousse (similar to her fav Bday cake from a few yrs back – chocolate cake, with strawberries hidden in the mousse). Would the white chocolate mousse recipe fom your site (pâté a bombe + white chocolate) be stiff enough to support a similarly constructed fraisier. (Yes, as conceived not technically a fraisier, but my soon-to-be 9 y.o. burgeoning baker doesn’t care about such technicalities, ESP when it comes to ….chocolate. Thanks for your help. -marie
Hi Marie!
That’s an interesting question. My feeling is yes, since the cocoa butter will make an even firmer stand-in for the mousseline. You’ll need to make sure you let it warm thoroughly (after cutting and before serving) so the mousse softens. Cold cocoa butter will make an even firmer filling when it’s chilled since cocoa butter is so much stiffer when it’s cold. It won’t cut as cleanly as the mousseline, but it’ll still look nice!
Have fun and send pictures!
Cheers,
– Joe
Oh my, oh my… Your cake looks so delicious and yummy… I love strawberries, pastry cream and cakes!!! Those things would be wonderful… I’ll bake this for my friend’s birthday cake and for myself, hahahaha… Thank you!^^
Have fun with it and send me pictures, Midia!
Cheers,
– Joe
Hi Joe, I am thinking of making this for a birthday next weekend. But strawberries in December can’t necessarily be counted on. Do you think that kiwis would be a suitable alternative? (Obviously not a fraisier at that point!) I’m not sure about the flavour combination (almond and kiwi?) and whether kiwis have a “bright” enough taste. If not, is there any other fruit you might suggest? I’ve seen some recipes that have mentioned using rasberries for the inside layer, which I think is doable, so I’m more concerned about the outside edge. Thanks!
Hey Jen! Kiwis should work just fine, though they are a bit juicier than strawberries on balance. You might want to slice them and pat them dry after they’re cut just to mitigate some of the moisture. Send pictures!
Cheerio,
– Joe
Thanks, will do!