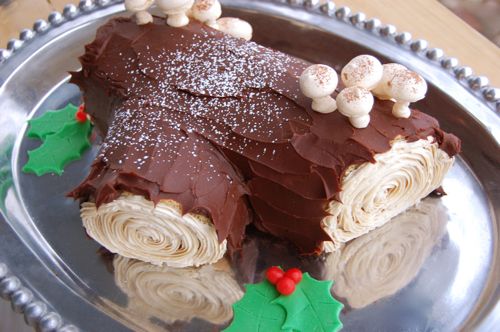
Assembling a Bûche de Noël
There are all kinds of ways to do a yule log, this is just one of scores of possible directions. So, take the below as a general guide and improvise as you see fit. I’ll try to point out opportunities for variation along the way.
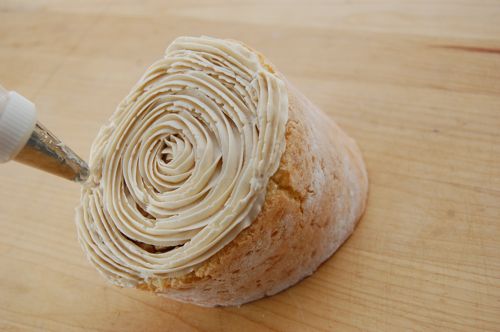
Actually, here’s one right off the bat. There’s a school of thought that holds that buttercream is too rich a filling for a cake as decadent as a bûche, and I can sort of see the point. So if you prefer, leave out the coffee-flavored buttercream and substitute a generous brushing of coffee-flavored cake syrup. If you decide to press on with the buttercream, apply only a thin layer to the unrolled génoise.
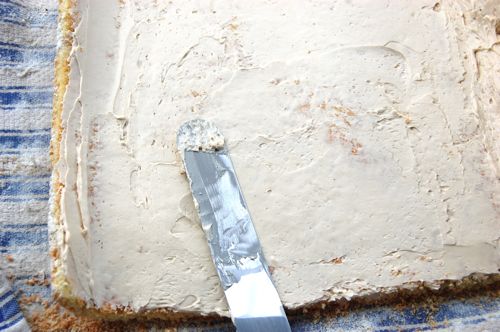
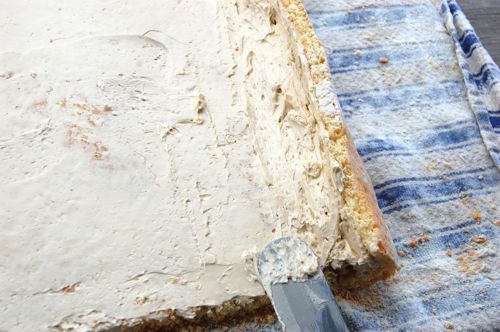
…except for right here at the far end where the roll begins. Apply a long mound of filling there, about an inch high, about two inches in from the very edge of the cake sheet. That gives the cake a center to roll around, and keeps the innermost part of the roll from breaking. See here I’m just filling up the little crook in the cake that remained after I unrolled the cooled sheet. Looks messy now, but trust me, it’ll turn out just fine.
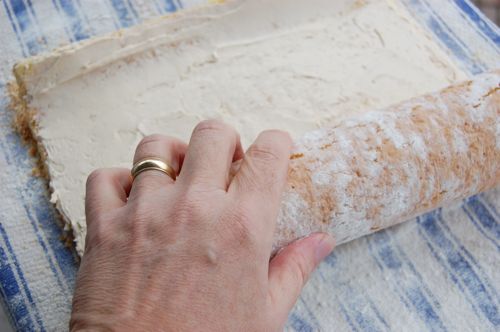
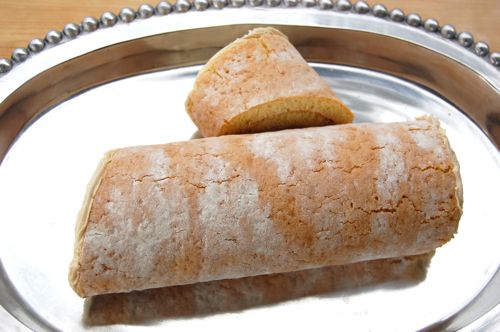
Now gently roll it back up.
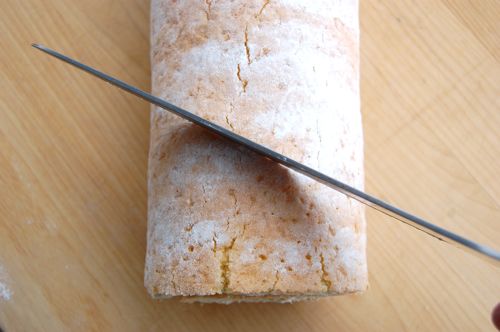
Lay the cake on a cutting board with the seam to the side, just touching the board.
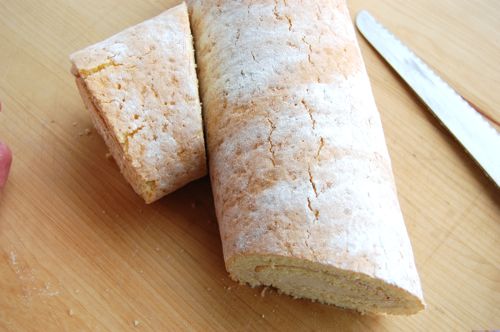
For the side branch, you really don’t need to cut too much of the cake off. See there on the right? I’m not taking even two inches off that side of the roll. Keep the seam on the long side of the cut, as that will help keep the branch piece from unrolling as you’re working with it.
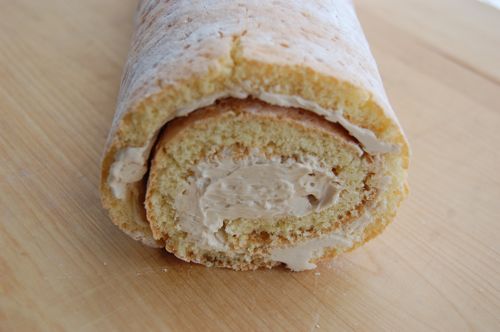
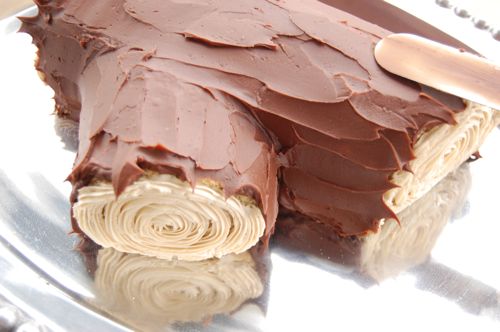
See what I mean about that cream-filled center? Looks nice.
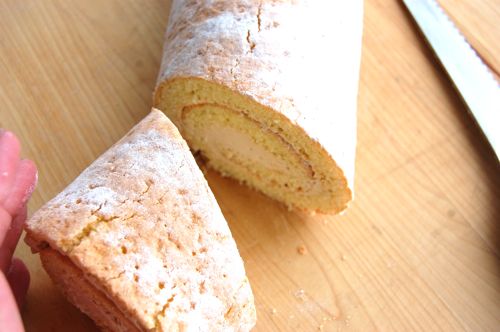
Figure out about where you want to place the branch. Some people like to put it on the top, sticking up. That’s always seemed a little dangerous for me. I like the side presentation. I should insert here that in some yule log-making traditions, a piece is never removed from the end. Small mounds of buttercream are place here and there along the length, and the ganache “bark” is simply piped around it. It’s a good method, though I avoid piping where I can…
…for obvious reasons. Yuck. Oh well, it came out good enough. I should have applied more pressure to the bag (I wouldn’t have gotten those rough edges). But heck, it’s fine. Use a medium-to-large star tip for this bit, as it creates the impression of wood grain. Doing the ends — or at least two of them — with the pieces upright is helpful. Have someone hold the trunk piece while you pipe (if possible).
Place the cake on a platter or board of your choice. Now’s a good time to brush off a little of that extra flour if you can. Then get out the ganache. You’ll have to fill in that gap where the branch meets the trunk, which isn’t difficult. Room-temperature ganache is very forgiving. You can apply it and re-apply it almost endlessly.
This is the bark effect I like. Lots of folks like to use a fork to make deep lines in the ganache along the length of the log. If that’s you, go nuts! The nice thing is that if you don’t like it, you can just smooth it all out again and start over. To get those little bark “points” that stick out over the edges, just continue your stroke out over the edge of the buttercream. A little of the ganache should come with you.
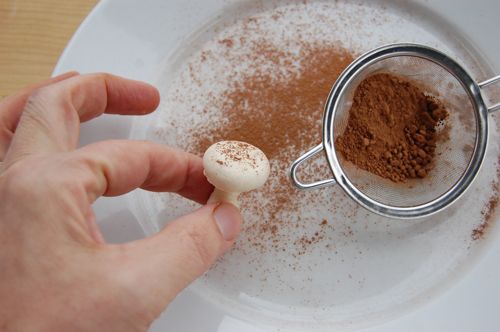
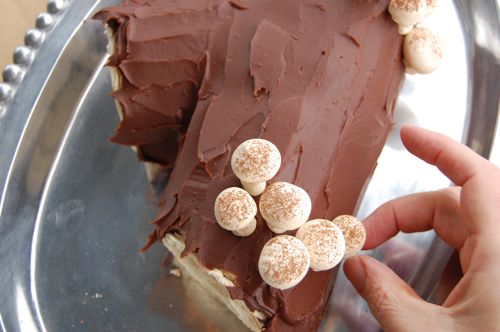
Now for the mushrooms. I dust mine with a little cocoa powder to give them a textured look. Pastry chef Laura mentioned that you can apply cocoa powder before you even bake the mushroom tops. I’d never heard of that, but it sounds like a great idea. Next year I’ll try it.
Now all you need to do is stick the mushrooms wherever you want. I do mine in clusters, as I mentioned. I like the look, what can I say? Someone recently told me that ground up pistachios make great moss. That’s something else I’ll have to try next year.
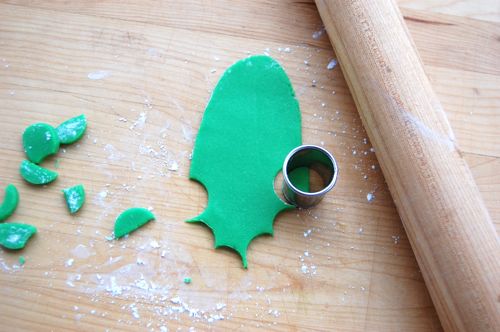
Now all that’s left are the marzipan holly leaves. They’re very simple. Just roll out a small piece of marzipan — which you kneaded green food coloring into, obviously — on a board that’s been lightly dusted with powdered sugar. Use a small cutter to nip away bits of the edge and create those spiky leaves. Here I’m using the smallest cutter from my Ateco set.
Arrange them as you wish with a few red red marzipan berries and you’re pretty much good to go! Oh, a little powdered sugar “snow” dusted on top makes a nice finish, but it’s completely your call. Wipe any errant bits of ganache or buttercream off your platter and you’re finshed! A yule log will keep well in the refrigerator, unwrapped, for up to two days.
Wow, very cool! I made a yule log cake a little while ago, I really like the look icing the sides gave to it! I’ll definately have to try that sometime.
Jess : )
I mentioned to a colleague that my boyfriend and I were planning on making a buche de noel for the first time. He said something like “oh, my friend just wrote a post about that!” Perfect. This is so helpful. Thank you!
I’m very glad, Dianne! Let me know how it goes!
– Joe
OK, Joe – We’ve completed the meringue but haven’t yet assembled them into mushrooms. I’m afraid the meringue wasn’t quite as stiff as it should have been so our bases and tops looks quite similar – we’ll have some squat mushrooms but I think we can make them work.
Tonight we made the Swiss Meringue Buttercream and it turned out great! We read the steps, got ready and jumped right in. Your photos and directions are very clear and helpful.
I’d also read about tempering the ingredients so the eggs and butter weren’t too cold. I did drop some egg shell and then a yolk into the whites but managed to get all uninvited ingredients out and it came together beautifully.
My boyfriend doesn’t want any coffee in the finished Buche de Noel so we simply added some vanilla and a pinch of salt to the SMB and then put it away so we didn’t stand their eating it by the spoonful. It is light, silky and delicious.
Tomorrow night we’re making the ganache which I’ve done before and is simple. We will also assemble our meringue mushrooms(but not with the ganache). Friday is the big day to bake our genoise and assemble the whole shebang!
We’ve decided to skip marzipan although if we made it from scratch we might find we liked the stuff!
Thanks for all your clear and helpful guidance and photos!
If we live to talk about it, I will be sure and send a picture or two!
Please do, Dianne! All my best to you and the boyf. Tell him I’m proud of him! 😉
– Joe
Thanks, Joe. We could NOT have done it without you and your recipes, photos and information. Spreading it out over the week made it possible and even then, as mentioned above, we ran into problems.
Making it during a very busy week when I’m staying up too late every night was probably not the best idea but when ELSE would we make a Buche de Noel?
End result: pretty awesome! The sponge was a bit tough, we made a second batch of ganache as first was too drippy (sloppy measuring), the mushrooms were kind of big, the cake broke on the very inside edge but it all came together.
Have a wonderful, wonderful Christmas. I will send photos.
Dianne and Rem
(I’m proud of him too) 🙂
Sounds great to me, Dianne! Thanks so much for the note.
Merry Christmas!
– Joe