Brick Oven Update
For those of you who may be wondering why it is I haven’t talked about bread much the last six months: I’ve been waiting on my brick oven. For those of you who’ve been wondering why I haven’t talked about my brick oven much for the last five months: I’ve been lazy. Well, that and I’ve been undermanned here at the Pastry estate. For I am no mason, despite the many similarities between brick laying and cake building. The fact that I can’t lick my fingers between the application of layers is a major drawback for me (the grit gets between your teeth). However about a month ago I learned that the master mason I’d engaged to do the really serious brick work was in a holding pattern until I’d finished the oven’s base. Since there was no one else around to do the work (a brick oven is way too small a job to get a real contractor interested), I was forced to dive in myself. And you know, it wasn’t so bad.
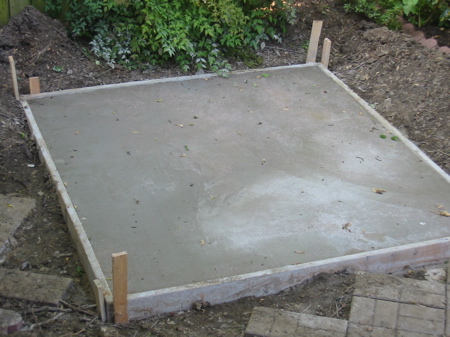
Earlier this summer, as you may recall, a house framer friend and I poured a concrete base for the monster. That was back in May, and it looked like this:
Well, nothing changed much for many months after that. All my friends who know what they’re doing in construction moved on to projects that would actually make them some money (sheesh!), while I got busy with a patio. As summer moved into fall I despaired that I’d ever attract any serious tradesman to do the work I needed done for the oven’s interior. So imagine my surprise when I found out one was ready and willing — and waiting on me!
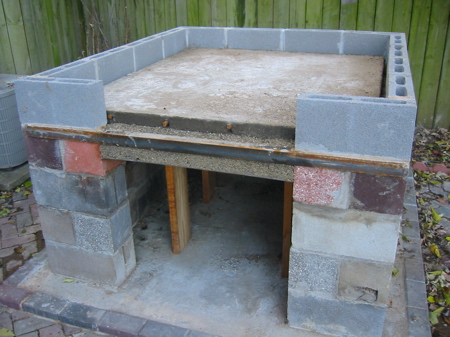
I rushed down to Lowe’s, bought some concrete, and dove right in finishing off the U-shaped cinder block base (it had been started for me by yet another contractor-friend). Next I got my courage up to put up the interior platform, onto which I’d pour an insulating layer of a vermiculite (a very lightweight mineral related to mica) mixed with concrete. On top of that would go a criss-crossed lattice of rebar before the concrete oven floor itself could be poured on. Though I fried my impoverished brain thinking through every blasted step six ways from Sunday, what I eventually wound up with was this:
No too shabby for a guy who can barely figure out which end of a hammer you use to hit a nail with. Well it wasn’t long afterward that Mr. Mason showed up with a truckload of firebrick and buckets of a special high-heat mortar called “fire clay” that (he says) will stand up to to the rigors of baking for decades. Saturday he spent the afternoon mixing and setting, and at the end of the day, my platform looked like this:
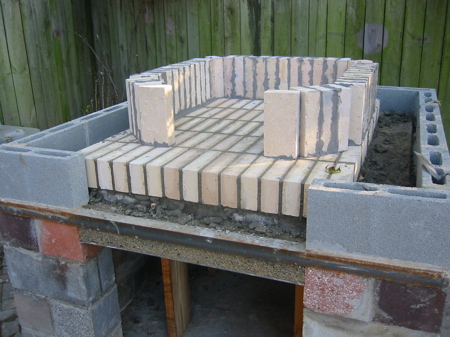
What you’re looking at is the fire brick baking floor (the mortar has been smoothed flat between the bricks), with the walls of the oven laid out around the edges. Here’s another angle:
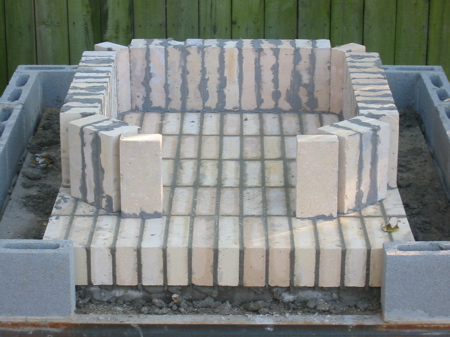
Amazing how small the baking area will be relative to the size of the oven itself isn’t it? However all that extra mass will function as a heat sink when I finally get down to baking. Which is to say it will absorb the heat from the fire I’ll burn in the baking chamber, then slowly giving all that heat back up once the fire is out, the floor has been mopped and the bread put in.
And so yesterday afternoon the mason came back and began the roof of the baking chamber. Here you can see that the back wall is up and the first course of ceiling brick has been laid over a styrofoam form:
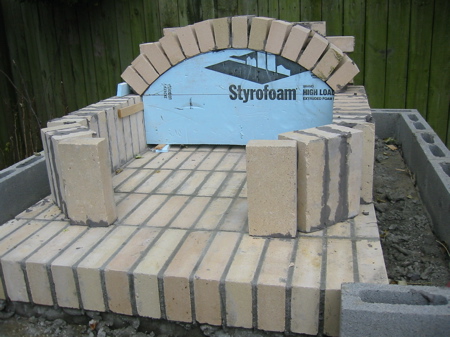
Once the clay is dry, he’ll pop out the form (notice the removable shim at the bottom that will provide the wiggle room), move it forward and lay the next course of brick (probably today). It’ll really get interesting in the next couple of days since the bricks, in addition to arching left to right, will have to slope forward as they approach the mouth of the oven. Should be interesting…
I am Russian, and I am a builder. I like this project the stove.
Hello Aleksey, very good to meet you. Are you going to build an oven also?
– Joe